Building my daughter's first ride (1969 Datsun 2000 roadster)
Moderators: notoptoy, S Allen, Solex68
-
Gregs672000

- Roadster Fanatic-Site Supporter
- Posts: 9001
- Joined: Fri Aug 07, 2009 11:47 pm
- Location: Tacoma, WA
Re: Building my daughter's first ride (1969 Datsun 2000 roadster)
Regarding the distributor curve, you will need to partially disassemble the distributor to see what parts it has (numbers are stamped on them). Non smog has 17 degrees of initial advance at idle and adds more to about 36 degrees while running, where as the smog is timed at ZERO 0 at idle, and it adds more to reach the same 36 degrees total... you can see the problem if you were to time a smog distributor with 17 degrees initial like a non-emissions distributor... waaaaaay to much total timing!
Greg Burrows
'67 2000 #588
Tacoma, WA
'67 2000 #588
Tacoma, WA
-
sfyks870
- Roadster Nut
- Posts: 47
- Joined: Fri Oct 20, 2023 9:12 pm
- Location: Louisiana, USA
- Model: 2000
- Year: High Windshield-68-70
Re: Building my daughter's first ride (1969 Datsun 2000 roadster)
Thanks Greg! That's really good info on the distributor, I'll definitely pull it and take a look before I get it going. It's usually easier to replace points and condenser with it out anyways. I also usually give them a good cleaning when they've been sitting up as long as this one has, so I'll look at the part stamps while I'm in there.
Yeah, I have a "little" experience with bringing back vehicles from the dead. I've never actually "finished" one though, if I'm being honest. Usually, find them, get them running/functioning/legal, begin working toward a vision, and then eventually lose interest and sell it to fund the next A.D.D. vision.
This project is a little different for me though. It's not for me. Doesn't even belong to me. I bought this car for my daughter with the end goal of having a sweet little ride she could be proud of. So, I'm hopeful that between the 2 of us we will be able to make it happen. She's a lot better motivator than my manic brain ever was afterall.
That being said, the original agreement between the two of us was: I'd buy the car for $500, and the rest came out of HER pocket.
And then there was the truck donor that I found and I figured "eh, it's just $100".
That wasn't gonna work, so I've inherited that back as a potential engine rebuild once my 65 dodge is "done".
Then the guys here pointed me toward the new donor, and that looks like it's going to be perfect, so I couldn't pass it up.
So, now the original initial investment ballooned rather quickly from $500 to $2200 total fairly quickly. But, I keep telling myself this is her project and she needs to be invested as well, and I need to quit throwing money at it.... but I think we all know how that's gonna go...
Yeah, I have a "little" experience with bringing back vehicles from the dead.
This project is a little different for me though. It's not for me. Doesn't even belong to me. I bought this car for my daughter with the end goal of having a sweet little ride she could be proud of. So, I'm hopeful that between the 2 of us we will be able to make it happen. She's a lot better motivator than my manic brain ever was afterall.
That being said, the original agreement between the two of us was: I'd buy the car for $500, and the rest came out of HER pocket.
And then there was the truck donor that I found and I figured "eh, it's just $100".
That wasn't gonna work, so I've inherited that back as a potential engine rebuild once my 65 dodge is "done".
Then the guys here pointed me toward the new donor, and that looks like it's going to be perfect, so I couldn't pass it up.
So, now the original initial investment ballooned rather quickly from $500 to $2200 total fairly quickly. But, I keep telling myself this is her project and she needs to be invested as well, and I need to quit throwing money at it.... but I think we all know how that's gonna go...
-
sfyks870
- Roadster Nut
- Posts: 47
- Joined: Fri Oct 20, 2023 9:12 pm
- Location: Louisiana, USA
- Model: 2000
- Year: High Windshield-68-70
Re: Building my daughter's first ride (1969 Datsun 2000 roadster)
Anyone have a good source of these shims? Also, what oil and or additives do you guys recommend for these engines? Considering its sat up for a decade or more, is there anything I need to run additionally like zinc etc.?Gregs672000 wrote: ↑Sat Oct 28, 2023 8:30 pm Before starting it, remove the cam cover and inspect the "evil L" that sticks out in front of the cam gear for chain strikes on the underside... the upper chain tensioner does not get pressure and therefore does NOT tighten the chain at start up, causing the chain slack to hit the L, eventually breaking it off and trashing the engine in a quick second. There's a fix for that using nylon shims.
Dig in!
Greg
-
sfyks870
- Roadster Nut
- Posts: 47
- Joined: Fri Oct 20, 2023 9:12 pm
- Location: Louisiana, USA
- Model: 2000
- Year: High Windshield-68-70
Re: Building my daughter's first ride (1969 Datsun 2000 roadster)
Also, I see you noted a particular ngk plug here. I was just gonna get one of the tune up kits to throw in it before I did to much. I was looking at this one and it included ngk plugs. I figured this would be sufficient, am I wrong? I'd like to know before I order it, as it seems a little pricey.Gregs672000 wrote: ↑Sat Oct 28, 2023 8:30 pm Change the oil, pour oil all over the cam and gear, squirt some oil into the cylinders via the spark plug holes, spin the motor by hand and then with the starter, get a fresh set of NGK BPR6ES plugs and cross your fingers!
Dig in!
Greg
You do not have the required permissions to view the files attached to this post.
-
Gregs672000
- Roadster Fanatic-Site Supporter
- Posts: 9001
- Joined: Fri Aug 07, 2009 11:47 pm
- Location: Tacoma, WA
Re: Building my daughter's first ride (1969 Datsun 2000 roadster)
I'm afraid I can't comment on parts costs much these days regarding that kit as I don't use many of them anymore! My best suggestion is to review the list of our great vendors and visit their sites and see what your options are. I have to say, I was on Ebay the other day and some prices on things scared me... rear wheel brake cylinders (!)... I'm glad I have different brakes but that's just a bonus from having had an RX7 LSD swap done many years ago...
I have always built this car on a budget, but I've had 37 years to build and modify it. I'm not so sure these cars fall into the "budget" build anymore like it did when I got mine... back then nobody wanted the "RoadSORE" as it was called, and said the U20 engine was a "boat anchor." Now folks are asking $30 for a soft top twist, which you need to secure the soft top down to the body, and I think there's 6? Yes, it's important that we have access to hard to find parts like this but it doesn't make it any easier to do a car on a budget anymore! It will pay to shop around as much as you can, and seek options (check the tech wiki for info on swaps or alternative parts).
I have always built this car on a budget, but I've had 37 years to build and modify it. I'm not so sure these cars fall into the "budget" build anymore like it did when I got mine... back then nobody wanted the "RoadSORE" as it was called, and said the U20 engine was a "boat anchor." Now folks are asking $30 for a soft top twist, which you need to secure the soft top down to the body, and I think there's 6? Yes, it's important that we have access to hard to find parts like this but it doesn't make it any easier to do a car on a budget anymore! It will pay to shop around as much as you can, and seek options (check the tech wiki for info on swaps or alternative parts).
Greg Burrows
'67 2000 #588
Tacoma, WA
'67 2000 #588
Tacoma, WA
-
sfyks870
- Roadster Nut
- Posts: 47
- Joined: Fri Oct 20, 2023 9:12 pm
- Location: Louisiana, USA
- Model: 2000
- Year: High Windshield-68-70
Re: Building my daughter's first ride (1969 Datsun 2000 roadster)
Ok, so.... got the 70 into the shop today and began some basic work. Firstly, I got a tune up kit from Dean and I gotta tell ya. Even though I thought the cost was a little steep, considering quick shipping, the quality of parts received, and the idea that the man has to make SOME profit, I'm completely pleased with the purchase. So, We went through and changed the points, rotator, distributor cap, and capacitor on the distributor. Also checked timing at TDC and found that it was good. Then swapped plugs and plug wires. Then changed oil to valvoline vr1 and installed a new oil filter. I then rigged up a temporary tank on the cowl area and using new fuel line flushed the fuel pump and bypassed the filter.
And then the moment of truth. I removed the spark plugs again, installed a new battery, and began turning it over to prime up the oil system and make sure the fuel pump was pumping. The engine was ticking like an Ethiopian with a studder and fuel began spraying everywhere. EVERY SINGLE PIECE of fuel line I didn't replace was spraying fuel. Agitated but not suprised or deterred, I began replacing ALL of the fuel line in the engine bay. Btw, the piece of fuel line between the su's is a COMPLETE PITA!
Round 2, began turning it over. Fuel starts POURING from the over flows on the su's. Not knowing anything about these carbs, I fiddled around for a minute and figured out it's just 4 screws holding each bowl on. Removed them to find the float sunk in bowls full of fuel... "SON OF A!!!!"... wait.... tinkered for a minute to find they weren't actually sunk, just stuck to the bottom with old gas. Removed them, cleaned them and the bowls, reinstalled and tightened down the bowl caps.
Round 3, began turning it over. Engine began to quiet down and pretty quickly all ticking had stopped. Did a thorough check for fuel on the shop floor again and to my surprise, NONE! Reinstalled the spark plugs, checked each spark plug wire with spark tester and I'm getting nice hot spark. Not worried about the cooling system yet, as I'm just wanting to hear it for a second to make sure there are no knocks or odd sounds.
The anxiety begins to get palpable. Final checks on everything and we are ready. Turn it over a few times and she sputters a couple times like it wants to start, but no dice.... finally I decide to give it a little gas while I crank and VROOM! SHE ROARS TO LIFE!!! And spits a MASSIVE rats nest out of the exhaust.
Quickly I check clutch and she slams to the floor completely lifeless. "GREAT..." gotta get that sorted before I can test out the Trans. I kill the car and check the clutch slave.... bone dry. Pulled out the hydraulic clutch fluid and top her up, pump the clutch a couple times and she burps and sucks down half the reservoir. Pump it again and still lifeless. Time to bleed the clutch. I climb under the car and brake the bleeder while my daughter pumps the clutch. Some of the nastiest fluid I've ever seen floods out. We continue until all the nasty fluid and air are purged from the system. She tells me the clutch gets extremely tough and then stops about half way. I crawl out and check and sure enough.... no dice. Looking at the slave I notice I am getting zero movement... "PERFECT...." I brake the bleeder and bleed off all of the brand new fluid, and remove the slave. Once it's out I take it apart and sure enough she's hardcore corroded. Some PB Blast and some vigorous wire brushing reveal the cylinder walls are horribly pitted and the piston is locked up TIGHT. Seriously.... I smacked it with a hammer, soaked it in vinegar, and pushed 150 lbs of air into the back side trying to get it to move.... no dice... off to O'Reilly we go.
At O'Reilly they tell me they show nothing for the car regarding the clutch slave.... "EXCELLENT...." so, I ask to see what they have in stock for an early nissan pickup. Sure enough, the first one we look at is identical except for the actuator shaft. And that part of mine is good. I just needed a new cylinder with moving piston and a new boot. Bought it for $22. It was for a 86 D21 btw.
Got home, swapped over the shaft, installed it on the car, refilled the reservoir, and bled the lines again. AND WE HAVE CLUTCH!
Time to fill the radiator. Begin filling with water for initial testing because I've learned that lesson the hard way and everything seems to be holding. There is some rust residue mingling with the water, so I decide to flush the system a few times with fresh water until I'm getting clear water from the drain, and then fill completely. The system was drained while it was stored, so I expect to flush it a few more times later after a couple heat cycles. Refill the system and fire her up again. SHE LOVES IT! She doesn't like to idle without a frog hair of gas, but she revs to the moon smoothly and sounds fantastic. And then the thermostat must have opened, and the steam show starts..... water is pouring from under the intake manifold. "OF COURSE... " I kill the car and begin looking for the leak. Its under the manifold but between the heatshield and the block. My heart sinks. Worried it might be a cracked block I drain the water and begin a closer inspection. JESUS! ITS STUPID TIGHT in there... after 30 mins or so of flopping on the shop floor like a pissed off beached whale.... I see it. It's a rusted freeze plug in the intake. "THANK GOD!!" So all I gotta do is remove the carbs, intake manifold, remove a freeze plug, measure it, and replace......
And after removing the top 4 nuts that hold the carbs to the manifold I decided to call it a day and here we are. Which leads me to a question.... HOW IN THE NAME OF ALL THAT IS HOLY do you get to the bottom nuts? And I assume there are nuts on the bottom of the intake as well that should be equally interesting to remove. I got a curved end wrench on all 4 and can move them about 1/16 of a turn per stroke. Just figured there has to be a better way.
Any Insight/advice is much appreciated.
TO BE CONTINUED TOMORROW!
-
Gregs672000
- Roadster Fanatic-Site Supporter
- Posts: 9001
- Joined: Fri Aug 07, 2009 11:47 pm
- Location: Tacoma, WA
Re: Building my daughter's first ride (1969 Datsun 2000 roadster)
Hahaha hahaha! Good Lord, after all that I'm surprised you have any energy left over to write that terrific Story! I see that you are not easily deterred... that's a good Thing! And you're adaptable/resourceful... excellent. And IT'S ALIVE... CONGRATS!
Regarding hydraulic systems, always make sure your fittings have the correct pitch if you're swapping in alternative parts. For example, you can use master cylinders for some Datsun 510 models on a Roadster if you use adaptors (see tech wiki for theses kinds of known swaps). I happen to have redone all my brake lines 37 years ago and did not know I was fitting in the "wrong" pitch lines. However that turned out good as it let me use a 510 master without adaptors, and I could get 510 masters off Rockauto for $25 bucks vs several hundred for a Roadster one at the time.
Regarding the intake removal, I've long since changed things to make it easier for me and I don't have the same intake manifold/carbs, so it's generally easy for me to remove things with 12 and 13mm wrenches. They can be a challenge and slow going. Others may chime in on any particular procedures they follow... perhaps consult the manuals?
Greg Burrows
'67 2000 #588
Tacoma, WA
'67 2000 #588
Tacoma, WA
-
sfyks870
- Roadster Nut
- Posts: 47
- Joined: Fri Oct 20, 2023 9:12 pm
- Location: Louisiana, USA
- Model: 2000
- Year: High Windshield-68-70
Re: Building my daughter's first ride (1969 Datsun 2000 roadster)
Thanks Greg! Also, just as an additional question to anyone who knows.... we replaced the trunk lid on this car yesterday with a good one that was supplied with the car. At some point someone had destroyed the original one trying to pry it open.
When you line up the body lines on the deck lid, what tolerance do you watch most? I ask because I tried to have a fairly even gap all the way around, but if I make the back (hinge area) gap equal to the side gaps, the front of the lid seems to stick out slightly farther than the rear body line. I've seen a couple other roadsters that look the same way, so I don't think this is to odd. However, it seems like I could tighten up the back gap and make the front body line match up better. But then the back gap would be significantly smaller than the sides.... idk... just wondering where you guys stand on this as I'm sure it's just a matter of preference.
When you line up the body lines on the deck lid, what tolerance do you watch most? I ask because I tried to have a fairly even gap all the way around, but if I make the back (hinge area) gap equal to the side gaps, the front of the lid seems to stick out slightly farther than the rear body line. I've seen a couple other roadsters that look the same way, so I don't think this is to odd. However, it seems like I could tighten up the back gap and make the front body line match up better. But then the back gap would be significantly smaller than the sides.... idk... just wondering where you guys stand on this as I'm sure it's just a matter of preference.
-
sfyks870
- Roadster Nut
- Posts: 47
- Joined: Fri Oct 20, 2023 9:12 pm
- Location: Louisiana, USA
- Model: 2000
- Year: High Windshield-68-70
Re: Building my daughter's first ride (1969 Datsun 2000 roadster)
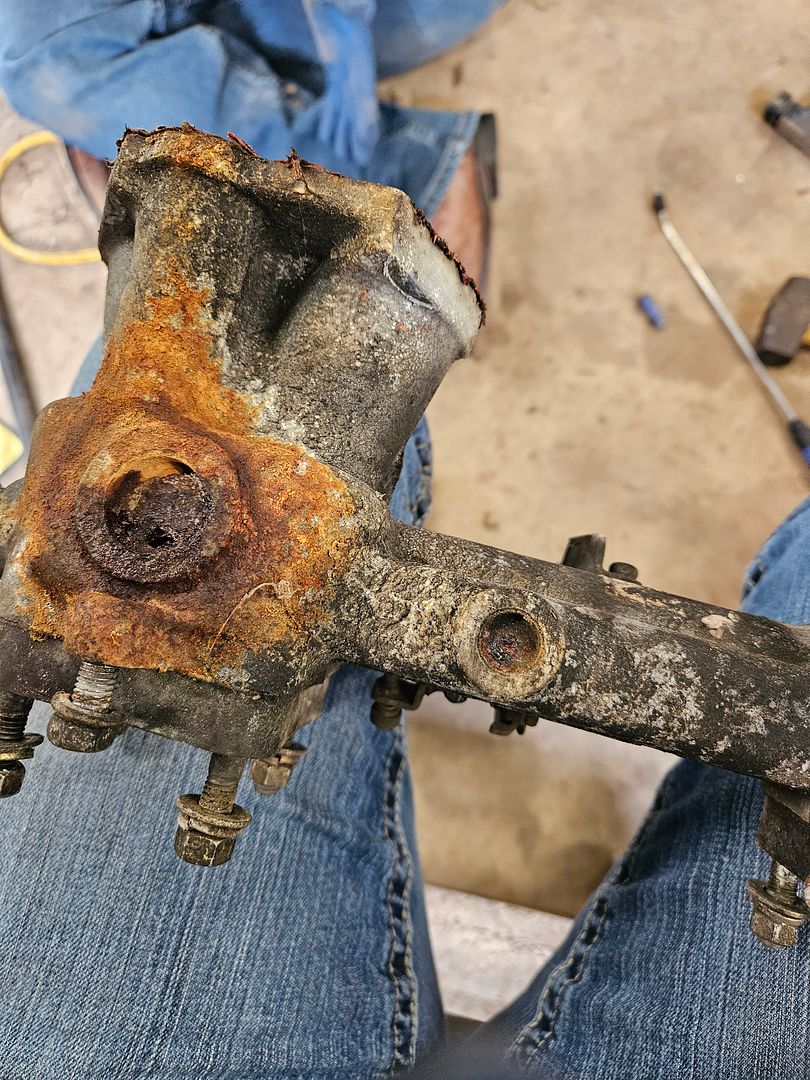
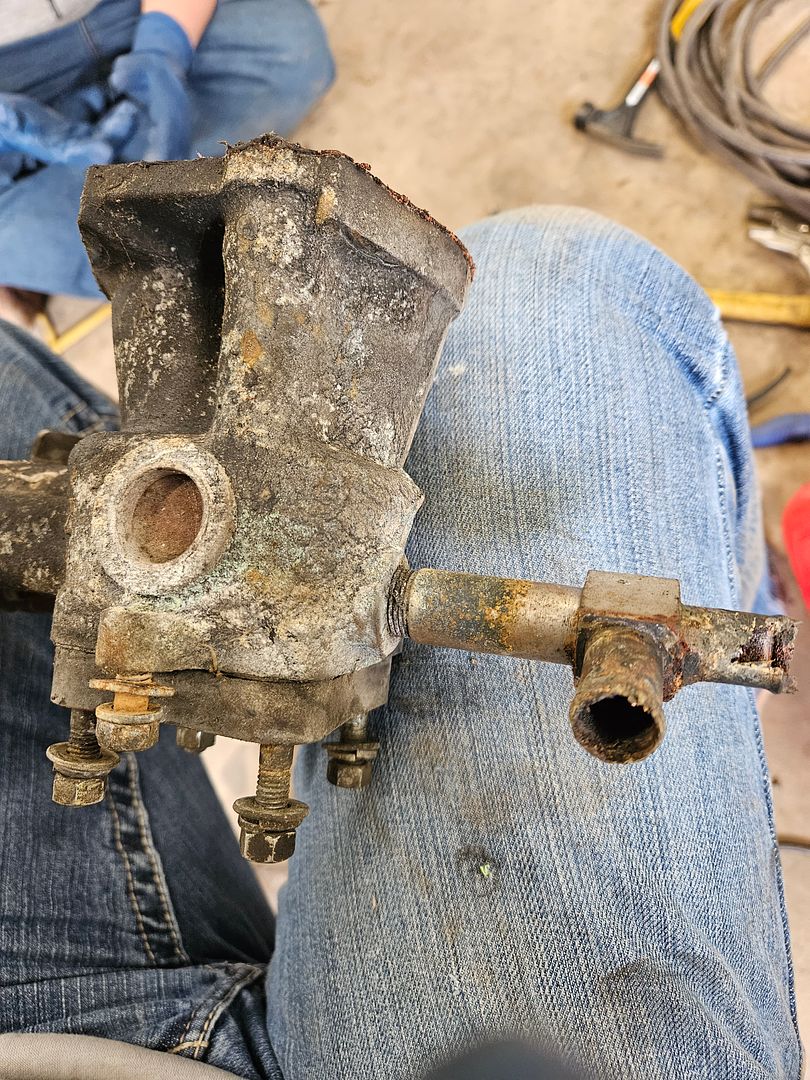
Ok.... that was a NIGHTMARE....but the carbs and intake are out of the car.
And now for the carnage....
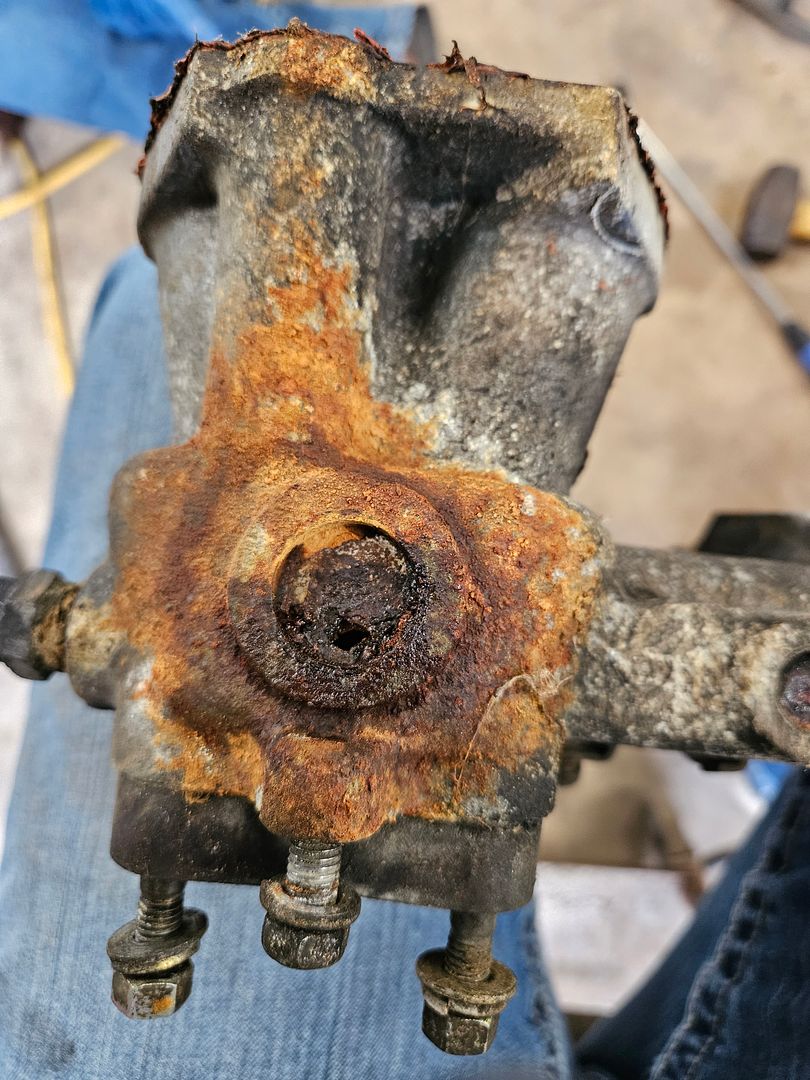
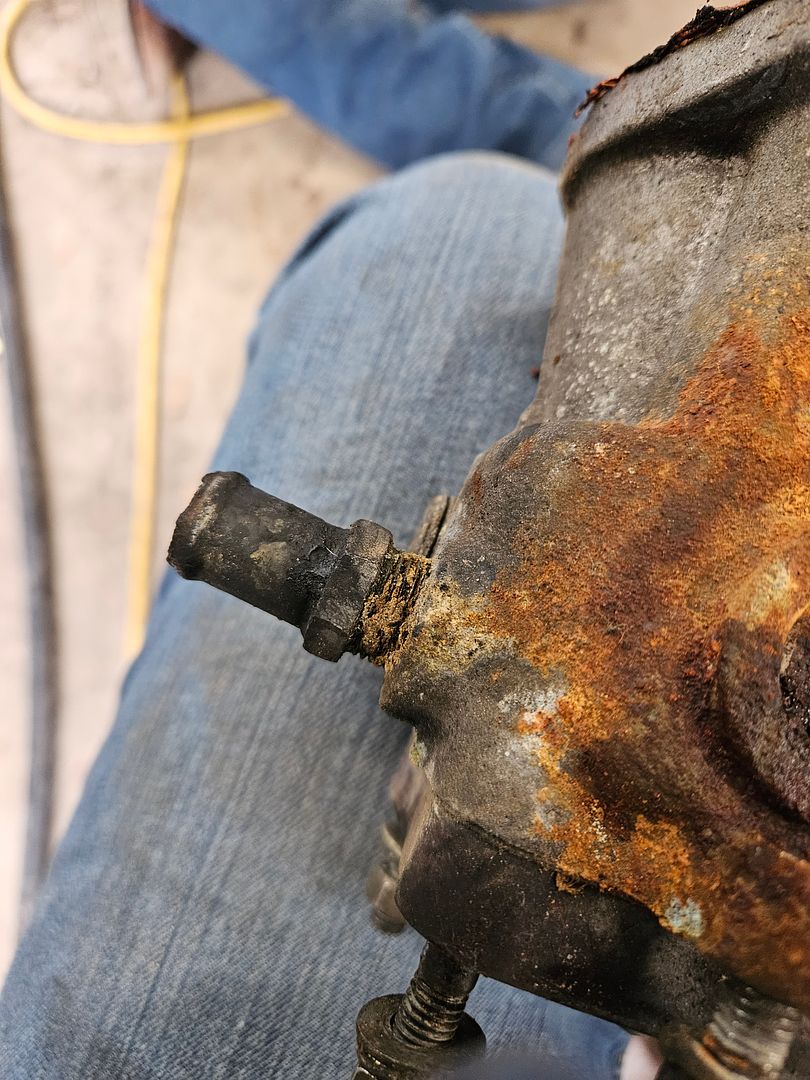
Yeah.... I need new freeze plugs. Anybody know what size these are and where I can get them?
Also.....
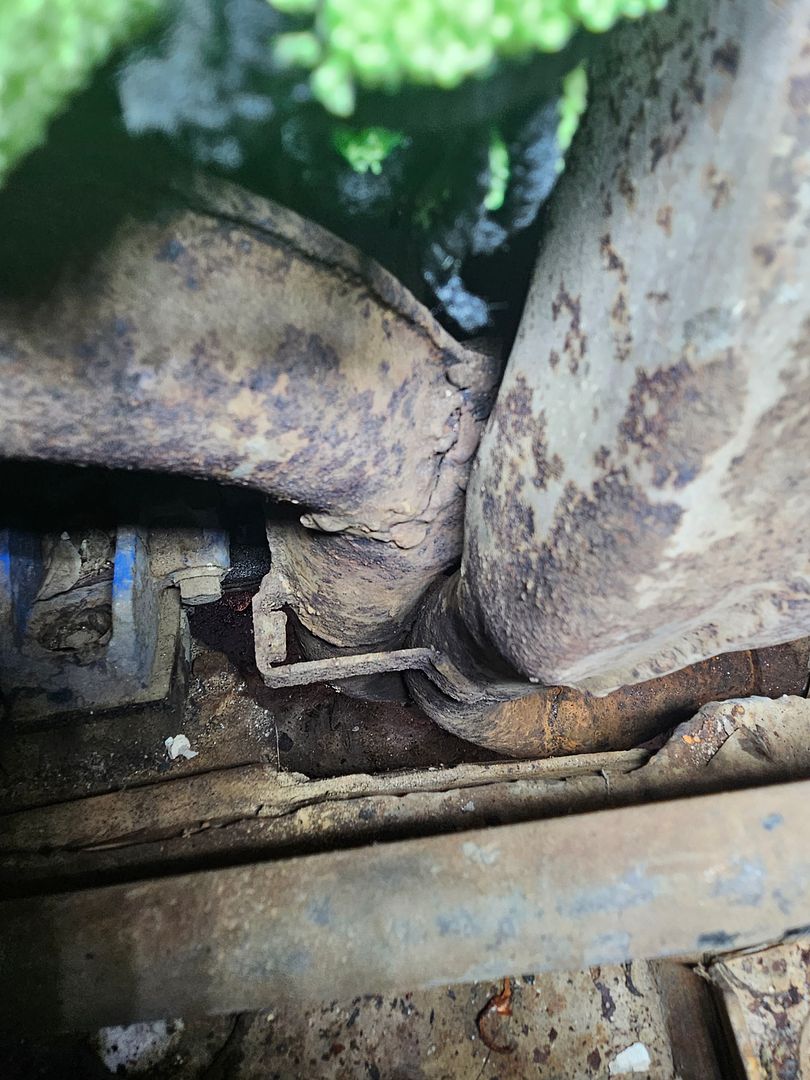
Cracked exhaust manifold. AWESOME! Judging by the ugliest buggar welds I've ever seen.... its not the first time it has cracked either. So, suggestions? Should I find a used stock replacement or are there aftermarket ones available?
Also, after the fiasco of taking that off, I think I'll just go ahead and pull the engine tomorrow so that all of this is easier to repair and replace. It'll give me more room to clean the engine bay and inspect things anyway. Any suggestions for things to look at while she is out?
And now for the carnage....
Yeah.... I need new freeze plugs. Anybody know what size these are and where I can get them?
Also.....
Cracked exhaust manifold. AWESOME! Judging by the ugliest buggar welds I've ever seen.... its not the first time it has cracked either. So, suggestions? Should I find a used stock replacement or are there aftermarket ones available?
Also, after the fiasco of taking that off, I think I'll just go ahead and pull the engine tomorrow so that all of this is easier to repair and replace. It'll give me more room to clean the engine bay and inspect things anyway. Any suggestions for things to look at while she is out?
-
DAC21
- Roadster Fanatic-Site Supporter
- Posts: 1110
- Joined: Tue Sep 15, 2020 7:44 am
- Location: California
- Model: 1500/1600
- Year: Low Windshield-64-67.5
Re: Building my daughter's first ride (1969 Datsun 2000 roadster)
Probably a new header is a cheaper alternative than tracking down a used OEM Ex. manifold. I could be wrong. Maybe put out a separate posting under "classifieds wanted"
Dean has a full setup for the 2000. It will be 20% off Black Friday weekend
https://datsunparts.com/collections/exh ... 9285518520
Dean has a full setup for the 2000. It will be 20% off Black Friday weekend
https://datsunparts.com/collections/exh ... 9285518520
1967 1600 in waiting SPL311-09002 / R-28178
2018 Hyundai Elantra GT Sport Ultimate
2018 Hyundai Elantra GT Sport Ultimate
-
DAC21
- Roadster Fanatic-Site Supporter
- Posts: 1110
- Joined: Tue Sep 15, 2020 7:44 am
- Location: California
- Model: 1500/1600
- Year: Low Windshield-64-67.5
Re: Building my daughter's first ride (1969 Datsun 2000 roadster)
Oopsy, my bad, looks like you need an intake not an exhaust.DAC21 wrote: ↑Sun Nov 12, 2023 3:40 pm Probably a new header is a cheaper alternative than tracking down a used OEM Ex. manifold. I could be wrong. Maybe put out a separate posting under "classifieds wanted"
Dean has a full setup for the 2000. It will be 20% off Black Friday weekend
https://datsunparts.com/collections/exh ... 9285518520
1967 1600 in waiting SPL311-09002 / R-28178
2018 Hyundai Elantra GT Sport Ultimate
2018 Hyundai Elantra GT Sport Ultimate
-
david premo

- Roadster Nut-Site Supporter
- Posts: 693
- Joined: Wed Jan 24, 2007 8:23 am
- Location: Southern Oregon
- Model: 2000
- Year: Low Windshield-64-67.5
- Contact:
Re: Building my daughter's first ride (1969 Datsun 2000 roadster)
Well I would say that the exhaust manifold is way past being repaired so I would look for a header or a good used factory manifold. The reason it failed is because the strap that keeps it from vibrating and cracking is not there. With regard to the intake manifold, you can replace the expansion plug and put it back in service. Also you can just weld up the hole and skip the plug. They are called freeze plugs, however the real reason they are there is that during the casting process that were the core box comes out. After the manifold was cast, they vibrate the casting and vacuum out the sand that is the core box which in that case was for water cooling/heating.
-
david premo
- Roadster Nut-Site Supporter
- Posts: 693
- Joined: Wed Jan 24, 2007 8:23 am
- Location: Southern Oregon
- Model: 2000
- Year: Low Windshield-64-67.5
- Contact:
Re: Building my daughter's first ride (1969 Datsun 2000 roadster)
Well I would say that the exhaust manifold is way past being repaired so I would look for a header or a good used factory manifold. The reason it failed is because the strap that keeps it from vibrating and cracking is not there. With regard to the intake manifold, you can replace the expansion plug and put it back in service. Also you can just weld up the hole and skip the plug. They are called freeze plugs, however the real reason they are there is that during the casting process that were the core box comes out. After the manifold was cast, they vibrate the casting and vacuum out the sand that is the core box which in that case was for water cooling/heating.
Dave
Dave
-
rbhenderson

- Roadster Nut
- Posts: 73
- Joined: Wed Oct 18, 2023 12:22 am
- Location: Houston
- Model: 1500/1600
- Year: High Windshield-68-70
- Contact:
Re: Building my daughter's first ride (1969 Datsun 2000 roadster)
It ran! That’s awesome!
Don’t have much to add that you don’t already know. I’ve been eyeing Evapo-rusts “Thermocure” product, it’s supposed to do a good job of cleaning up the cooling system internals. If you don’t have a tub of evapo-rust I highly recommend that too it’s like magic! I think harbor freight has the best price but I haven’t checked very deep.
Don’t have much to add that you don’t already know. I’ve been eyeing Evapo-rusts “Thermocure” product, it’s supposed to do a good job of cleaning up the cooling system internals. If you don’t have a tub of evapo-rust I highly recommend that too it’s like magic! I think harbor freight has the best price but I haven’t checked very deep.
-
sfyks870
- Roadster Nut
- Posts: 47
- Joined: Fri Oct 20, 2023 9:12 pm
- Location: Louisiana, USA
- Model: 2000
- Year: High Windshield-68-70
Re: Building my daughter's first ride (1969 Datsun 2000 roadster)
Nah, I think you nailed it bud. The intake is very salvageable from what I can tell. I looked it over pretty well and didn't see any cracks or anything. Just the rotted out freeze plugs and "y" on the end. That can all be replaced and the casting itself will be as good as new after a trip through the media blaster.
The exhaust however..... is toast. I'm going to remove it tomorrow before pulling the engine and inspect farther, but previous repairs and then recracking in the same spot tell me everything I care to know to be honest. Good call on deans exhaust header kit and the 20% off btw! I'll probably go ahead and take advantage of that.