Fixing up dad's old 69 SRL

Here can put pictures and write-ups about your roadster or other vehicles.

Moderators: notoptoy, S Allen, Solex68

Post Reply
iloveredmeat
Roadster Nut-Site Supporter
Posts: 788
Joined: Thu Aug 08, 2019 3:36 pm
Location: San Diego
Model: 1500/1600
Year: Low Windshield-64-67.5

Re: Fixing up dad's old 69 SRL

Post by iloveredmeat »

akara wrote: Fri Apr 28, 2023 8:04 pm
OId light housings reflect more light with a white paint than with a "reflective" paint, so the parking lights and tail housings got some fresh bright white paint.
Akara, I really like this idea... will any high-gloss white paint work? Enamel?

I'm going to be fiddling with my under-dash light.

Thanks!
Peter
Peter
––
1967.5 1600 – Second Owner – Under Reconstruction
1970 Honda CT70
1953 Airstream 21' Flying Cloud – Second Owner
akara
Roadster Nut
Posts: 46
Joined: Sat Oct 04, 2014 12:24 am

Re: Fixing up dad's old 69 SRL

Post by akara »

iloveredmeat wrote: Thu May 18, 2023 12:49 pm
akara wrote: Fri Apr 28, 2023 8:04 pm
OId light housings reflect more light with a white paint than with a "reflective" paint, so the parking lights and tail housings got some fresh bright white paint.
Akara, I really like this idea... will any high-gloss white paint work? Enamel?

I'm going to be fiddling with my under-dash light.

Thanks!
Peter
You want a "bright" white, I used a Bonding Primer I had that was very bright white. If you plan to use a hot incandescent bulb maybe look for a High Temp white? A white Epoxy Paint could work well.
Last edited by akara on Thu May 18, 2023 1:04 pm, edited 1 time in total.
Seattle, WA
1969 SRL311
1972 PL510
akara
Roadster Nut
Posts: 46
Joined: Sat Oct 04, 2014 12:24 am

Re: Fixing up dad's old 69 SRL

Post by akara »

More photos of progress from this last week

Layer of closed cell foam behind an MDF spacer creates a nice speaker pocket in the factory hole.
116.jpg
kick panel fitted, snapped on speaker grill
117.jpg
bit more sound deadening on the rear deck after patch panels
118.jpg
Had to trim the edges and reglue on this rear panel to get it to fit nicely.
20230411_200224.jpg
Put the passenger door on, greased all the linkages and window regulator, polished the glass, new weatherstripping
119.jpg
Bought a lock set for doors and trunk for a datsun truck for $75, I was able to modify them to work on the Roadster with grinding a tab off the lock body.
20230409_194446.jpg
Started trying to polish up these aluminum trims, Ive tried almost everthing to remove the dark pitting! First I tried a brass brush and that did nothing at all, then I tried brushing with toothpaste, I tried a soft brass brush on my wirewheel, I tried acid cleaners, etc. The aluminum oxide corrosion is harder than the aluminum itself so its very diffcult to remove without damaging the aluminum. In the end I was able to get OK results by sandblasting, and then using Black cutting compound on a buffing wheel, followed by brown tripoli.
120.jpg
Fitted the door panel, I bought clips for a TR6 off ebay for 25$ Door handle and pocket were rechromed, and I glued on Deans little trim strips for the door handle. Generic chrome window cranks.
121.jpg
Test fit the carpet, its the one from Newark auto I think that Brian Zana has on his website Sin City Datsuns.
20230506_210634.jpg
Fitment is okay for the price...I just wish It was provided without the jute preglued-so that I was easier to install the snaps. The jute must be carefully cut away from the adhesive for the snaps to be installed.
122.jpg
Bought some cheap retractable belts for now from amazon, test fittin the seats.
You do not have the required permissions to view the files attached to this post.
Seattle, WA
1969 SRL311
1972 PL510
iloveredmeat
Roadster Nut-Site Supporter
Posts: 788
Joined: Thu Aug 08, 2019 3:36 pm
Location: San Diego
Model: 1500/1600
Year: Low Windshield-64-67.5

Re: Fixing up dad's old 69 SRL

Post by iloveredmeat »

akara wrote: Thu May 18, 2023 1:02 pm You want a "bright" white, I used a Bonding Primer I had that was very bright white. If you plan to use a hot incandescent bulb maybe look for a High Temp white? A white Epoxy Paint could work well.
Thanks for that, and Wow! Really nice work on everything. Inspiring work.

Good on ya,
pm
Peter
––
1967.5 1600 – Second Owner – Under Reconstruction
1970 Honda CT70
1953 Airstream 21' Flying Cloud – Second Owner
davdav2000
Roadster Fanatic
Posts: 149
Joined: Sun Jul 29, 2018 8:29 pm
Location: Seattle, WA
Model: 2000
Year: High Windshield-68-70

Re: Fixing up dad's old 69 SRL

Post by davdav2000 »

Bought some cheap retractable belts for now from amazon, test fittin the seats.
[/quote]

The retractable seat belts can be mounted on the rear fender well in the stock spot for OEM harnesses. There is a captured nut already there. If you push down on the vinyl, you should feel the hole in about the middle towards the top. I have me retractable belts mounted there and works great.
David
70 SRL
68 SPL
68 SPL Parts car
akara
Roadster Nut
Posts: 46
Joined: Sat Oct 04, 2014 12:24 am

Re: Fixing up dad's old 69 SRL

Post by akara »

Ended up just mounting to the rollbar mount on the floor, I am using 2pt belts because I dont have a roll.bar, and I dont like the stock spine squisher setup. I tested the retractor lock mechanism in this position and they work fine.
20230526_131208.jpg
I put the cnter console in, I had to hunt down some longer black 8-32 shifter plate screws.
124.jpg
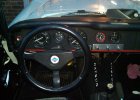
Needed a new wheel, my old Grant foam wheel was degraded and rusty.
125.jpg
2" Momo short hub from Flashpower and a low offset wheel (10-50mm)fits the roadster best.
126.jpg
I bought this Momo California wheel because I liked how it looked with its larger diameter, thin grip, and circular spoke pattern similar to the original Roadster wheel.
127.jpg
When I got it I did NOT like it, The leather didnt feel nice, the stitching was uneven and seams were poorly trimmed, and left unstitched! Where the leather meets on the wheel is not stitched at all, just glued, and the chrome spoke finish wasnt good, the thin wheel wasnt comfortable, and it wasnt comfortable having an unpadded spoke on my thumb. Yes this was a genuine momo wheel. I returned it.
128.jpg
Bought this Renown wheel instead,bit smaller 350mm diameter, same low offset, a bit thicker grip, brushed spokes, nice perforated leather and really nice stitching all around, and padded spokes. Leather feels nicer, and the wheel was cheaper.
129.jpg
This Renown wheel is completely stitched with nicer leather.
I dont have the steering column mounted up all the way so it looks a little funny, you can see the gauges just fine once the column is mounted up another few inches.
130.jpg
Still need to address the wiring in the engine bay and rear of the car.
There's a good way and a bad way to do bullet connectors...
131.jpg
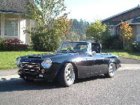
Got the wiring sorted and fitted lights and trim to rear, fitted carpet and mounted the amp.
132.jpg
You do not have the required permissions to view the files attached to this post.
Seattle, WA
1969 SRL311
1972 PL510
iloveredmeat
Roadster Nut-Site Supporter
Posts: 788
Joined: Thu Aug 08, 2019 3:36 pm
Location: San Diego
Model: 1500/1600
Year: Low Windshield-64-67.5

Re: Fixing up dad's old 69 SRL

Post by iloveredmeat »

Wow man, some serious progress!

Good to know about the Momo / Renown differences.

I'm partial to original steering wheels, but I think your Renown wheel is the coolest aftermarket one I've seen.

And awesome work as always.
Peter
––
1967.5 1600 – Second Owner – Under Reconstruction
1970 Honda CT70
1953 Airstream 21' Flying Cloud – Second Owner
akara
Roadster Nut
Posts: 46
Joined: Sat Oct 04, 2014 12:24 am

Re: Fixing up dad's old 69 SRL

Post by akara »

I am pushin to get driving now that the weather is nice!
I really love looking at old vintage/original wheels, but I tend to enjoy using sporty wheels in sporty cars. I think the Renown strikes a good balance between those for me, it's nice that they use the momo hub pattern too so I didnt need a new one. I definitely wouldnt want to go any smaller than 350mm on a Roadster. Momo will build a similar wheel custom if you ask them, a Momo Prototipo Airleather with cross stitching, and they want over $600 for it! After seeing the quality of the first momo wheel I got I had to pass on that! haha! :roll:
Seattle, WA
1969 SRL311
1972 PL510
akara
Roadster Nut
Posts: 46
Joined: Sat Oct 04, 2014 12:24 am

Re: Fixing up dad's old 69 SRL

Post by akara »

Ok I won't lie I lost a little momentum last month when I got the car running, I realized it needs more work than I thought. The engine ran hot and leaked coolant from the thermostat housing, and it didn't want to steer, and the brakes went to the floor.
20230512_210431.jpg
Cooling system is nasty, needed a new thermostat housing, I got one from rising sun racing and he also had an old used core b-type steering box for me to upgrade to
20230523_115409_HDR.jpg
This one was real rusty on the outside

20230523_120334_HDR.jpg
But the gear inside was in good condition

20230523_210720_HDR.jpg
New bearings and seals and paper shim to set the perfect pinion preload. Preload is set before the seal or sector gear are installed.
Thanks to a member posting here about the Woodward steering u-joint that allows you to convert the earlier steering column with the Toyota style spline to the B type box, they had it in stock. used all my early style steering components except the box.

20230526_200406_HDR.jpg
idler arm has .015" of play, will need bushings.

20230527_112554.jpg
pitmanarm that I received on my b-type steering box was exactly the same shape in every dimension as the pitman arm that was mounted on my cars A type box.
B type steering box moves the pitman arm out 3-4 millimeters further towards the driver side, as far as I can tell this will have no discernible effects on steering geometry since tie rod length will stay the same. center link will just need to be adjusted longer by some amount similar to 4 mm. adding a shim to the move the idler arm box should not be necessary and might cause you to need to extend your centerlink even further at which point you may not have enough threads for engagement.

20230527_112615_HDR.jpg
The state of the engine bay is a mess...

20230601_114807_HDR.jpg
corrosion damage to the shaft seal area repaired with SKF speedisleeve

20230601_150412_HDR.jpg
slotted the frame hole for B type box
20230602_141433_HDR.jpg
All the balljoints are crusty and full of mud with no boots like this.
I soaked them in gasoline and brushed them with wire brush. Then I coated with epoxy. The joints are still in good condition. I'll fit new boots.
20230603_130453.jpg
20230603_144455.jpg
All painted up and fitted. Still need to clean and grease the balljoints on the car
You do not have the required permissions to view the files attached to this post.
Seattle, WA
1969 SRL311
1972 PL510
User avatar
notoptoy
Vendor-Site Supporter
Posts: 9677
Joined: Fri Oct 02, 2009 2:55 pm
Location: Winston-Salem, NC and Ocala, FL
Contact:

Re: Fixing up dad's old 69 SRL

Post by notoptoy »

Great work and steady progress, well done!
"When all else fails, force prevails!" Ummm, we're gonna need a bigger hammer here.

67.5 SPL311 H20 w/5 speed
65 Impala Convertible
2017 C43 AMG
User avatar
Gregs672000
Roadster Fanatic-Site Supporter
Posts: 9001
Joined: Fri Aug 07, 2009 11:47 pm
Location: Tacoma, WA

Re: Fixing up dad's old 69 SRL

Post by Gregs672000 »

As always, your work is top notch. Couple of things I noted in the engine pic... make sure your radiator is solid, and/or consider a three core replacement, and fitmet may change with the different steering box (?); I'm a fan of electric fans for a number of reasons (easier access, don't require or come with their own shroud, can be more quiet, non-parasitic)... your 4 blade would be the next choice though usually plastic); there appears to be NO base circle left on that cam... do you know what it is and if the lash pads were measured/changed to account for this? The chain guide "L" has been cut off but I can't see if the tensioner is shimmed... highly recommended. I'm sure you'll be digging into everything with your usual thoroughness and clear talent... car is going to be great!
Greg Burrows
'67 2000 #588
Tacoma, WA
akara
Roadster Nut
Posts: 46
Joined: Sat Oct 04, 2014 12:24 am

Re: Fixing up dad's old 69 SRL

Post by akara »

Wow good eye Greg! The cam is a custom grind from Shneider Cams, 284/292 with .5" of lift.
cam.jpg
Im using chromoly retainers with L series lash pads and 100lbs springs.
I want to build a high performance naturally aspirated stroker U20 for the street that puts out 160-180WHP and drives like a KA24.
I want to find someone to manufacture a custom crankshaft for U20 with 98mm stroke, and Ford Duratec 2.0 rod journal size.
This will allow off the shelf rods for Duratec to be used, with off the shelf 88mm pistons from Dodge Neon, for a 2.5L U20
The roadster cylinder head is really good, but the forklift bottom end is its downside. The head wants to rev but the bottom doesnt, the crank and flywheel are massively heavy, journal sizes are much too large, the oil pump is weak. Just looking at the U20 bottom end I can tell it would not be happy above 6500rpm, So I dont want to build a high revving 2L engine.
I want to delete the water pump and fan as well, I watched an episode of Engine Masters,
https://www.youtube.com/watch?v=ZXdLgaFXZzs
And I bet the fixed fan and water pump are consuming at least 30whp+ on my car.
Naturally aspirated horsepower gains are expensive and an electric fan and pump are some of the cheapest ways to get more power. I've never had a custom crank made before, might need a core crank to send out somewhere.
You do not have the required permissions to view the files attached to this post.
Seattle, WA
1969 SRL311
1972 PL510
User avatar
Gregs672000
Roadster Fanatic-Site Supporter
Posts: 9001
Joined: Fri Aug 07, 2009 11:47 pm
Location: Tacoma, WA

Re: Fixing up dad's old 69 SRL

Post by Gregs672000 »

I know a good crank guy near me. He was going to repair mine after I buggered it but I ended up buying another.

Yes, I know technology has advanced a lot, and I'm no engineer, but most "fork lifts" didn't come with a forged steel crank did they? :lol: I would not underestimate a U20. Mine won't see more than 7000rpm on purpose, but several guys who race them here regularly hit 8500rpm. But I'm not going to argue or discourage anything you want to do, believe me!

My engine is about 11 to 1, Arias pistons, Total Seal rings, expert port and polish, 48mm intake 38mm exhaust valves with 8mm stems (larger valves were an experiment, probably unnecessary but yet to be fully seen yeah or nay or wash or hurt), 40mm Jenvey Heritage TBs controlled by Microsquirt, crank-fired ignition (Ford EDIS) and a custom (i.e. still needing dyno time) timing map, Isky cam (278 duration or 246 duration at. 050, .537" total lift), aluminum flywheel, typical header (area for improvement), 2.25 exhaust. Still needs dyno time to finalize my timing map, but I think it's close (famous last words I've said before! :roll: ). Prior to the fuel injection I ran 45mm Dellortos with 37mm chokes and a similar crank fired ignition (Megajolt). Honestly it was not as happy as it is now with EFI and a better ignition map, and it did 141+whp at 6200rpm 133+torque at 4700rpm. It was this that led me to EFI, as the engine was drowning at 10.5 to 1 AFR on the dyno and I was sick of carbs. I'm excited to get it finalized on the dyno now... I think 150whp is well within range. But what's more, this is a very decent engine on the street... easy to drive, doesn't fuss (except for its desire for high octane fuel, it's tuned to 92), not camy, can be launched on a hill in downtown Tacoma like any car. I love it.

I am very interested in your cam. Is that that they refer to as a "dual pattern" grind? What experience have you had with it and others? I'm all Ears! And upside down... can't ever get these damn pics right... click and it's correct.
:smt006
20230613_202302.jpg
You do not have the required permissions to view the files attached to this post.
Last edited by Gregs672000 on Tue Jun 13, 2023 11:03 pm, edited 1 time in total.
Greg Burrows
'67 2000 #588
Tacoma, WA
User avatar
Gregs672000
Roadster Fanatic-Site Supporter
Posts: 9001
Joined: Fri Aug 07, 2009 11:47 pm
Location: Tacoma, WA

Re: Fixing up dad's old 69 SRL

Post by Gregs672000 »

BTW, I still have my old damaged crank (thrust destroyed) so it would be available as a core to shop around.
Greg Burrows
'67 2000 #588
Tacoma, WA
akara
Roadster Nut
Posts: 46
Joined: Sat Oct 04, 2014 12:24 am

Re: Fixing up dad's old 69 SRL

Post by akara »

Ill let you know about the crank Greg!!! Thanks for the offer, I have read about your car before, its an awesome build and inspiring, very interested to see what it makes on the dyno now! I think I would love fuel injection too but I am also not afraid of carbs. I really dont like tuning DCOEs though, I was thinking about making a motorcycle carb manifold, because I am really comfortable tuning those.


I didnt mean forklift in a disparaging way, in fact I find the history of the U20 engine quite amusing, I just like to joke and call it a "racing forklift motor" :lol: :lol: :lol: I just meant to point out what I perceive as some disparity in design intent between the bottom end and cylinder head, it seems to me that can be reduced by increasing the displacement of the U20, once you do that the port sizes begin to make sense for the RPM the bottom was intended for a street motor.
The crankcase of the U20 seems quite large, I have read reports of 100mm+ stroker cranks fitting. Most of my experience is buildin KA24 engines and the U20 piston and rod setup is so heavy at 1400 grams or so, maybe its more like a diesel forklift engine! :roll: :lol: A lot of people spend money on custom rods and piston setups when building engines but my idea was to spend a big chunk of change on a custom lightweight crank, I can use cheap and light off the shelf Ford rods and Mopar Pistons. the Ford rods can be had almost free and mopar pistons are 250 a set https://www.summitracing.com/parts/uem-kb241-5mm.
That piston.rod setup would weigh 800g or so, over 5lbs removed from the reciprocating mass total, Imagine even more weight removed from a custom crank and a lightweight flywheel, and youll pick up even more power in lower gears.

My engine is definitely overcammed right now, I was thinking about end goals when I had it ground. It makes power to 7500rpm but lost torque, it simply isnt a match for the stock compression pistons, SU carbs, and I think the exhaust necks down to 1 7/8" thru the frame. Once I get some 10.5 compression and god induction it should wake that cam up, but I have no idea how im going to get enough exhaust thru that frame hole!! Every Naturally Aspirated 4 stroke engine ive ever built makes the most power with the biggest exhaust possible. I think making 160-180whp with a 2.5/2.25
exhaust will be challenging!! :? :? Thats another reason for the "split profile" cam design, also the exhaust port and header shape are not great designs.
Seattle, WA
1969 SRL311
1972 PL510
Post Reply