https://www.youtube.com/watch?v=IvTxQfIuj-M
Random clips of the cam lope and U20 sound from my phone
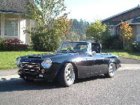
Fixing up dad's old 69 SRL
Moderators: notoptoy, S Allen, Solex68
-
akara
- Roadster Nut
- Posts: 46
- Joined: Sat Oct 04, 2014 12:24 am
Re: Fixing up dad's old 69 SRL
Seattle, WA
1969 SRL311
1972 PL510
1969 SRL311
1972 PL510
-
Gregs672000
- Roadster Fanatic-Site Supporter
- Posts: 9001
- Joined: Fri Aug 07, 2009 11:47 pm
- Location: Tacoma, WA
Re: Fixing up dad's old 69 SRL
Thank you Akara, I took no offense and my ego is not tied up in the car (just love)... it's been a really fun, "amateur with a lot of help" hobby that's evolved over 37 years with many mistakes, shade tree budget solutions/fixes, and "it's good enough for me, it's not a show car" (works but it's not pretty) journey, but that's what makes it fun for me. Just yesterday I pulled my oil pan and removed the crank scraper I tried out for awhile. Despite a lot of time checking clearance on the stand I suspected it was still being tapped due to slight fore and aft movements of the crank more than I anticipated, and sure enough I found a couple spots on the plate that showed contact. That coupled with it causing the dip stick to sit against it and vibrate  drove me nuts so out she came! Ahhhh, no more rattle, but I'm pretty sure the valves are still tapping slightly against the block (long story). It's quiet with a lower lift cam (I have a Racer Brown grind available) but for whatever reason it really liked the Isky lift enough that I'm willing to put up with a tap (hasn't hurt it). Live and learn! I'm very comfortable with carbs too, but the idea of having full control over ratios everywhere via computer just appealed to me, and more important was the timing control with this compression. That too has been a real learning curve... but that's why I do it! These days I think I'm done adding new systems and just want it reliable, and we're pretty close. I post stuff so people can learn from my success or mistakes, or say "told ya!", or guide me, or whatever... it's all good to me! I'd love to have someone like you or Spriso completely rebuild the car as I have it but at a professional level of skill (good Lord they would laugh/cringe at what they would find!) but then again when I get a rock chip I'm not crying or worried... just another battle scar! Hope to meet you at the Green Lake car show! OK, enough of hacking your thread...!

Last edited by Gregs672000 on Wed Jun 14, 2023 10:53 am, edited 1 time in total.
Greg Burrows
'67 2000 #588
Tacoma, WA
'67 2000 #588
Tacoma, WA
-
Gregs672000
- Roadster Fanatic-Site Supporter
- Posts: 9001
- Joined: Fri Aug 07, 2009 11:47 pm
- Location: Tacoma, WA
Re: Fixing up dad's old 69 SRL
Sound pretty darn happy!akara wrote: ↑Wed Jun 14, 2023 4:16 am https://www.youtube.com/watch?v=IvTxQfIuj-M
Random clips of the cam lope and U20 sound from my phone
Greg Burrows
'67 2000 #588
Tacoma, WA
'67 2000 #588
Tacoma, WA
-
akara
- Roadster Nut
- Posts: 46
- Joined: Sat Oct 04, 2014 12:24 am
Re: Fixing up dad's old 69 SRL
I'll be at the greenwood car show so I'll try to catch up with you there!
if you want to fix your crank scraper, I have good luck with trimming back the steel portion and then riveting in small flaps of Teflon plastic, the Teflon will happily wipe all the oil away without making any noise.
ordered an electric fan kit from Summit and an idler arm rebuild kit from Dean,
while I wait for those I've been thinking about brakes, I want to do Altima rotors and 240SX rear disc, I have some free credit with a laser cutter so I'm going to try to design all the brake part adapter kit stuff myself and have it laser cut.
disassemble the front end today and found bad lower ball joints, I should have expected that!! lucky rareparts makes new ones.
once I busted the spindle off it was really easy to check the play and all the ball joints and control arm bushings and everything is nice and tight except the lower ball joints.
You do not have the required permissions to view the files attached to this post.
Seattle, WA
1969 SRL311
1972 PL510
1969 SRL311
1972 PL510
-
akara
- Roadster Nut
- Posts: 46
- Joined: Sat Oct 04, 2014 12:24 am
Re: Fixing up dad's old 69 SRL
dropped my axles off at a local shop and asked them to press off the rear axle bearing for me because I didn't want to mess it up cutting them off myself
they then proceeded to butcher it and cut deep into the axle right where the axle seal goes, instead of using a press. ruined both axles
I should have just left the axles on and cut the backing plates off but I wanted to save them and that's what lead me down this rabbit hole and now the axles are destroyed so that's annoying.
I did manage to paint the front suspension with por15 after scraping and pressure washing again. I got a new idler arm bushing but I accidentally reamed it out too far and messed it up so I have to buy another one, not too mad about that cuz it's my first time learning but I should have known to buy two in the first place!
I broke a bone in my foot so I'll have to take a break for a bit, I was able to sit on the floor and do some painting but I won't be able to do much standing over the engine bay, I need to figure out what to do about these axles and get these rear brakes sorted next
You do not have the required permissions to view the files attached to this post.
Seattle, WA
1969 SRL311
1972 PL510
1969 SRL311
1972 PL510
-
iloveredmeat
- Roadster Nut-Site Supporter
- Posts: 788
- Joined: Thu Aug 08, 2019 3:36 pm
- Location: San Diego
- Model: 1500/1600
- Year: Low Windshield-64-67.5
Re: Fixing up dad's old 69 SRL
Oh man, what a bummer about the axles. That just flat out sucks. I sure hope they'll compensate you for replacements.
And the foot.
But, great news on the front suspension, that looks great. I'm amazed at how much you've done in such a short period of time.
Hope you heal up quickly, and Happy Father's Day to you and your Dad's old car!
Peter
And the foot.
But, great news on the front suspension, that looks great. I'm amazed at how much you've done in such a short period of time.
Hope you heal up quickly, and Happy Father's Day to you and your Dad's old car!
Peter
Peter
––
1967.5 1600 – Second Owner – Under Reconstruction
1970 Honda CT70
1953 Airstream 21' Flying Cloud – Second Owner
––
1967.5 1600 – Second Owner – Under Reconstruction
1970 Honda CT70
1953 Airstream 21' Flying Cloud – Second Owner
-
akara
- Roadster Nut
- Posts: 46
- Joined: Sat Oct 04, 2014 12:24 am
Re: Fixing up dad's old 69 SRL
Roadster update!
Drew up a few parts for the laser cutter while I've been layed up with my broken foot.
Should have those parts in a week or two
Bought a lot of parts to finish suspension n brakes from rockauto and amzon. 22mm amazon reamer, $20
reamed until .001" undersize, then hone surface to fit with brake cylinder hone.
Once a tight sliding fit is achieved, polish bushing with 1000 grit paper on brake cylinder hone.
It fits perfectly now, smooth and 100% no slop.
pumped full of moly grease
Shocks were 22$ shipped each!
Shocks and steering all installed, all zerks greased and new boots.
New lower balljoints. It feels buttery smooth but tight with no slop or binding to steer and move the suspension.
Laser cut bearing spacer n new wheel seals, discoverd bad front wheel bearing and replaced it. packed hubs with fresh high temp grease
Foil shims were placed under two rotor mounting bolts to achieve .0005" runout.
Without the shims the runout was .005", unacceptable.
EBC Red pads and calipers fitted, used two .100" thick washers to space caliper.
Had that shop reimburse my money for another set of axles.
Wanting something done right all too often feels like I have to do it myself these days...
Cut the collars and berings off easily without scratching the axles. Once the collar is cut 90% it loses its hold and is easily pressed off
Bought a press to rebuild the idler and install new axles bearings, etc.
You do not have the required permissions to view the files attached to this post.
Seattle, WA
1969 SRL311
1972 PL510
1969 SRL311
1972 PL510
-
akara
- Roadster Nut
- Posts: 46
- Joined: Sat Oct 04, 2014 12:24 am
Re: Fixing up dad's old 69 SRL
Made a lot more progress recently, my foot healed up enough finaly to work on it again.
Continuing on from last time, I was able to remove the bearings and backing plates easily myself without damaging the shaft once I had the right tools.
Designed n laser cut a bunch of parts, front bearin spacer for vented rotors, steering wheel spacer, electric water pump mount, and rear disc brake brackets.
Pressed on backing plate deletes and new bearings and seals from Sin City Datsuns
Rear 240sx brakes installed, ebrake working
Designed this alternator mount that mounts to longer front cover bolts.The mount itself is double shear to the cover to make it rigid, and then the alt mounts single shear with a big bolt
Had this water pump delete spigot 3d printed in aluminum, it was pretty affordable.
No more water pump and no more fixed fan to rob horsepower.
Threw the driver side door on finally, trimmed it all up with the dor panel and lock and window regulator
Weld fix for the original broken glass guides
Drilled and tapped new thermostat housing for 1/4" NPT electric water pump sensor.
Mockup mounting 100A mini alternator and electric water pump on passenger side with Spal electric fan and shroud
You do not have the required permissions to view the files attached to this post.
Last edited by akara on Mon Aug 21, 2023 9:46 pm, edited 3 times in total.
Seattle, WA
1969 SRL311
1972 PL510
1969 SRL311
1972 PL510
-
akara
- Roadster Nut
- Posts: 46
- Joined: Sat Oct 04, 2014 12:24 am
Re: Fixing up dad's old 69 SRL
New sockets and wiring for the sidemarker, I put a bright dual filament type LED in there after.
Brakes bled, its so much easier with these quick bleeders.
Here's what came out of the fuel filter....chocolate!
I bought a new windshield from Glass America, because they have a location in my neighborhood and said they would install it as well, it was $400, so not super cheap.
The glass was made by Fuyao Glass, FW00214, after rescheduling me 4 times they then decided they didnt want to help install it at all, and I couldnt find anyone to come out to help me from any other glass company.
Frustrated, I ended up doing it myself, It wasnt too hard
Seal on glass first, then rope seal into car, then rope trim into seal.
Roping the trim was hardest part, there are some angles that are difficult,Dish soap and a small pick helped save the day.
Time to restore the wheels they were corroded and covered in embedded brake dust.
First I start with a blasting with Garnet Media
Then I swap media in my cabinet to a Fine Glass Bead and finish it.
The alternator and water pump mount turned out well, doesnt look super pretty but functional. The pump is rubber mounted to the frame, no more thermostat, easy bleeding with the engine off. I added a small relay fusebox for the fans, fog lights pump, HID headlights, pump
new fuel filter pre pump and post pump, new fuel hoses, cleaned the carb bowls.
Fusepanel layout
Installed some Xpel Ultimate Paint Protection Film on the rear deck area where the hardtop will sit, little dish soap and water, and a felt squeegee was all that was needed. Cant even tell its there! $50 for a 4ftx12" strip direct from Xpel
Finished some details on the interior. The steering wheel spacer allows the horn button to clear the column nut. Driver seat, seatbelts, sunvisors installed.
Pulled it out and took it on its first drive in a long time.
First stop was fresh fuel
Back up the hill into my neighborhood it had a bit of a misfire going on, the plugs were sooty and it burns some oil, and its still on the points ignition. New spark plugs is next on the list.
You do not have the required permissions to view the files attached to this post.
Seattle, WA
1969 SRL311
1972 PL510
1969 SRL311
1972 PL510
-
rwmann

- Roadster Fanatic-Site Supporter
- Posts: 701
- Joined: Wed Aug 20, 2008 6:11 am
- Location: Port Washington, NY
- Model: 2000
- Year: High Windshield-68-70
Re: Fixing up dad's old 69 SRL
Looking good!
-
Gregs672000
- Roadster Fanatic-Site Supporter
- Posts: 9001
- Joined: Fri Aug 07, 2009 11:47 pm
- Location: Tacoma, WA
Re: Fixing up dad's old 69 SRL
That's an understatement! Wow man, what incredible work! I'll be embarrassed to pop the hood (or even bring the car) with all the amateur shade-tree BS on my motor, but I look forward to seeing the car in person. You have really done admirable and creative work! Like me, it's time to do some driving before the rain returns... congratulations!
P.s. Interesting choice on the electric water pump. On a side note, when I was researching repair issues and part costs for the 2005 BMW X3 that I recently purchased, before I decided to buy it I noted it has a mechanical belt driven water pump, $43 on Rockauto. The same 2006 model switched to an electric pump, which became known for failure, and it cost $685-850, BEFORE installation. Mmmm ya... BMW... Bring My Wallet...
Greg Burrows
'67 2000 #588
Tacoma, WA
'67 2000 #588
Tacoma, WA
-
akara
- Roadster Nut
- Posts: 46
- Joined: Sat Oct 04, 2014 12:24 am
Re: Fixing up dad's old 69 SRL
Thanks guys! I am still embarassed to pop my hood as well, I havent tried to clean it up at all just been focusing on function so I can drive it before its wet again!
I wanted to try some new ideas to gain naturally aspirated horsepower, I am using to building turbo and forced induction engines, never tried an electric pump but this one was about the same cost as a Roadster water pump! its a Davies Craig Alloy EWP150, with controller, also works the fan.
I needed to get rid of the old 4 blade fixed fan, and I really hate pusher fans, and mounting fans to the fins directly, never had good luck with those.
I chose pretty much the thinnest puller fan that is actually powerful and from a good brand, SPAL 30101522, and the minimum effective shroud, .75" from the fins. This hit the water pump pulley, I tried moving the radiator forward but it hit the hood, try moving the rad down and it hits the steering.
Kinda forced my hand, electric water pump it is! and that helps reduce even more parasitic load and everything fits away from the hot header side of the engine bay. The EWP controller is very efficient and uses only around 10a or less. No thermostat so less to pump against for no reason.
Seattle, WA
1969 SRL311
1972 PL510
1969 SRL311
1972 PL510
-
rwmann
- Roadster Fanatic-Site Supporter
- Posts: 701
- Joined: Wed Aug 20, 2008 6:11 am
- Location: Port Washington, NY
- Model: 2000
- Year: High Windshield-68-70
Re: Fixing up dad's old 69 SR
I use a SPAL 14” puller, mounted flush with the fins, and it clears the water pump nose by a magical 0.75”. Went to a single row water pump pulley driving both water pump and right-side alternator. Electronic thermostat triggering the SPAL.
Last edited by rwmann on Tue Aug 22, 2023 6:25 pm, edited 1 time in total.
-
akara
- Roadster Nut
- Posts: 46
- Joined: Sat Oct 04, 2014 12:24 am
Re: Fixing up dad's old 69 SR
Good to know, that would be the easiest route, I'll keep that in mind if I ever want to ditch this electric pump!
Seattle, WA
1969 SRL311
1972 PL510
1969 SRL311
1972 PL510
-
akara
- Roadster Nut
- Posts: 46
- Joined: Sat Oct 04, 2014 12:24 am
Re: Fixing up dad's old 69 SRL
Today I was messing with the carbs all day, the are SU carbs with the sealed bearing throttles. Changing the plugs didnt fix the bad running so I welded an o2 sensor into the exhaust.
With RA Needle, at steady state.
When tuned for good idle, it goes full lean stumble at 1/8 throttle(19:1), 25mph. 1/4 to 1/2 Throttle is perfect, full throttle is rich (11:1)
With Stock Needle, at steady state
When set for perfect idle, it goes lean from 1/8 to 2/3 then 2/3 to full throttle is perfect(13:1-12:1)
I tried messing with needle protrusion and mixture nozzle heights all day but couldnt find a combination that fixed the low speed off idle stumble when driving slowly around the neighborhood. If I set the mixture to be correct at 2500rpm with the service screw, the idle is much too rich (11:1) with both needles.
My car does have a funky cam in it but otherwise not sure why the difficulty in tuning here, I looked at charts of .100 Needles here https://tecb.eu/onewebmedia/Tuning_SU_Carbs.pdf
But it seems like the RA needle is the richest off idle needle listed?
I then found another thread here
viewtopic.php?t=27779
Where it was suggested weak piston springs can cause it, but the solution wasnt clear. My springs do seam weak, I had a thought of making an idle air bleed bypass but I might look at the springs or piston weight next?
Seattle, WA
1969 SRL311
1972 PL510
1969 SRL311
1972 PL510