Need some eye bleach?iloveredmeat wrote: ↑Tue Oct 11, 2022 3:50 pm Wow! Pickin' away, great job and actual progress.
And that Lindsay reference was so funny, I was compelled to do an image search... which was a mistake. Can't unsee it...
'67.5 SPL311 1600 Roadster Restoration: Let the fun begin!
Moderators: notoptoy, S Allen, Solex68
-
Florida Roadster
- Site Supporter
- Posts: 341
- Joined: Tue Apr 12, 2022 6:08 pm
- Location: Tampa, FL
- Model: 1500/1600
- Year: Low Windshield-64-67.5
Re: '67.5 SPL311 1600 Roadster Restoration: Let the fun begin!
-Jeff-
1967.5 SPL311 Datsun Roadster 1600/2000 (Full Restoration Project)
1970 Triumph GT6+ (Full Restoration Project. Waiting up on the shelf.)
1967.5 SPL311 Datsun Roadster 1600/2000 (Full Restoration Project)
1970 Triumph GT6+ (Full Restoration Project. Waiting up on the shelf.)
-
Florida Roadster
- Site Supporter
- Posts: 341
- Joined: Tue Apr 12, 2022 6:08 pm
- Location: Tampa, FL
- Model: 1500/1600
- Year: Low Windshield-64-67.5
Re: '67.5 SPL311 1600 Roadster Restoration: Let the fun begin!
Thanks, I didn't think they were critical at the moment.
-Jeff-
1967.5 SPL311 Datsun Roadster 1600/2000 (Full Restoration Project)
1970 Triumph GT6+ (Full Restoration Project. Waiting up on the shelf.)
1967.5 SPL311 Datsun Roadster 1600/2000 (Full Restoration Project)
1970 Triumph GT6+ (Full Restoration Project. Waiting up on the shelf.)
-
Florida Roadster
- Site Supporter
- Posts: 341
- Joined: Tue Apr 12, 2022 6:08 pm
- Location: Tampa, FL
- Model: 1500/1600
- Year: Low Windshield-64-67.5
Re: '67.5 SPL311 1600 Roadster Restoration: Let the fun begin!
Making a little progress each day. Took apart the head, removed all the exhaust/intake studs, thermostat housing studs, valves and springs. Removed the carbon off the valves in the drill press, polished the valves, lapped the valves/seats, polished the combustion chambers. Still need to take it to the machine shop to get hot tanked and milled. Soaked the pistons, removed the rings, cleaned the grooves, soaked again, etc. My plan is to use the existing pistons. I honed the cylinders and measured the bores and they were all within clearance. I'll have the block hot tanked and decked. While I am there I will have them just look at the crank and measure it, maybe polish the journals if needed. Then start the rebuild!
You do not have the required permissions to view the files attached to this post.
-Jeff-
1967.5 SPL311 Datsun Roadster 1600/2000 (Full Restoration Project)
1970 Triumph GT6+ (Full Restoration Project. Waiting up on the shelf.)
1967.5 SPL311 Datsun Roadster 1600/2000 (Full Restoration Project)
1970 Triumph GT6+ (Full Restoration Project. Waiting up on the shelf.)
-
Florida Roadster
- Site Supporter
- Posts: 341
- Joined: Tue Apr 12, 2022 6:08 pm
- Location: Tampa, FL
- Model: 1500/1600
- Year: Low Windshield-64-67.5
Re: '67.5 SPL311 1600 Roadster Restoration: Let the fun begin!
Disassembled, blasted, cleaned, inspected, and partially rebuilt the steering box and idler arm assembly. I need to order a few small parts. I'll paint or powder-coat everything later. If you all remember playing Operation as a kid, that's what it was like trying to replace all those damn needle bearings in the steering "ball" shaft! Surprisingly, I didn't lose any of them! I have not attached the idler arms, I'll need to do some research, it appears there are notches in the splines that probably need to be aligned a certain way with the shaft in a particular position. More on that later.
You do not have the required permissions to view the files attached to this post.
-Jeff-
1967.5 SPL311 Datsun Roadster 1600/2000 (Full Restoration Project)
1970 Triumph GT6+ (Full Restoration Project. Waiting up on the shelf.)
1967.5 SPL311 Datsun Roadster 1600/2000 (Full Restoration Project)
1970 Triumph GT6+ (Full Restoration Project. Waiting up on the shelf.)
-
Florida Roadster
- Site Supporter
- Posts: 341
- Joined: Tue Apr 12, 2022 6:08 pm
- Location: Tampa, FL
- Model: 1500/1600
- Year: Low Windshield-64-67.5
Re: '67.5 SPL311 1600 Roadster Restoration: Let the fun begin!
I have all the brake components apart and did the preliminary cleaning. Honed the rear wheel cylinders, look good, and luckily I will not have to re-sleeve the fronts. Going to order re-build kits for both. Lower ball joints are still good, tight, and move freely with no binding, I'll get new boots and paint. One of the upper ball joints was well-worn and loose, so I'll replace both. I'm trying to use as many of the original parts as possible and plan on keeping this a full original restoration. No restomods this time around!
You do not have the required permissions to view the files attached to this post.
-Jeff-
1967.5 SPL311 Datsun Roadster 1600/2000 (Full Restoration Project)
1970 Triumph GT6+ (Full Restoration Project. Waiting up on the shelf.)
1967.5 SPL311 Datsun Roadster 1600/2000 (Full Restoration Project)
1970 Triumph GT6+ (Full Restoration Project. Waiting up on the shelf.)
-
Gregs672000
- Roadster Fanatic-Site Supporter
- Posts: 9059
- Joined: Fri Aug 07, 2009 11:47 pm
- Location: Tacoma, WA
Re: '67.5 SPL311 1600 Roadster Restoration: Let the fun begin!
Crankin right along!
Greg Burrows
'67 2000 #588
Tacoma, WA
'67 2000 #588
Tacoma, WA
-
Florida Roadster
- Site Supporter
- Posts: 341
- Joined: Tue Apr 12, 2022 6:08 pm
- Location: Tampa, FL
- Model: 1500/1600
- Year: Low Windshield-64-67.5
Re: '67.5 SPL311 1600 Roadster Restoration: Let the fun begin!
Can I get my weekend back? Lots of blasting, frame, inner and outer front fenders, firewall, brake rotors and drums which were new before surface rust set in, exhaust manifold, miscellaneous parts, oil pan, spare (tire) Roadster rim, and MGA rims. My Roadster steel wheels are currently keeping the MGA off the ground. Same bolt pattern. Need to order some tires for both then swap.
You do not have the required permissions to view the files attached to this post.
-Jeff-
1967.5 SPL311 Datsun Roadster 1600/2000 (Full Restoration Project)
1970 Triumph GT6+ (Full Restoration Project. Waiting up on the shelf.)
1967.5 SPL311 Datsun Roadster 1600/2000 (Full Restoration Project)
1970 Triumph GT6+ (Full Restoration Project. Waiting up on the shelf.)
-
Florida Roadster
- Site Supporter
- Posts: 341
- Joined: Tue Apr 12, 2022 6:08 pm
- Location: Tampa, FL
- Model: 1500/1600
- Year: Low Windshield-64-67.5
Re: '67.5 SPL311 1600 Roadster Restoration: Let the fun begin!
Did I ever mention that I hate sand(glass)blasting?
You do not have the required permissions to view the files attached to this post.
-Jeff-
1967.5 SPL311 Datsun Roadster 1600/2000 (Full Restoration Project)
1970 Triumph GT6+ (Full Restoration Project. Waiting up on the shelf.)
1967.5 SPL311 Datsun Roadster 1600/2000 (Full Restoration Project)
1970 Triumph GT6+ (Full Restoration Project. Waiting up on the shelf.)
-
notoptoy
- Vendor-Site Supporter
- Posts: 9677
- Joined: Fri Oct 02, 2009 2:55 pm
- Location: Winston-Salem, NC and Ocala, FL
- Contact:
Re: '67.5 SPL311 1600 Roadster Restoration: Let the fun begin!
But the results sure are satisfying!
"When all else fails, force prevails!" Ummm, we're gonna need a bigger hammer here.
67.5 SPL311 H20 w/5 speed
65 Impala Convertible
2017 C43 AMG
67.5 SPL311 H20 w/5 speed
65 Impala Convertible
2017 C43 AMG
-
Florida Roadster
- Site Supporter
- Posts: 341
- Joined: Tue Apr 12, 2022 6:08 pm
- Location: Tampa, FL
- Model: 1500/1600
- Year: Low Windshield-64-67.5
Re: '67.5 SPL311 1600 Roadster Restoration: Let the fun begin!
-Jeff-
1967.5 SPL311 Datsun Roadster 1600/2000 (Full Restoration Project)
1970 Triumph GT6+ (Full Restoration Project. Waiting up on the shelf.)
1967.5 SPL311 Datsun Roadster 1600/2000 (Full Restoration Project)
1970 Triumph GT6+ (Full Restoration Project. Waiting up on the shelf.)
-
C.Costine
- Roadster Nut-Site Supporter
- Posts: 1736
- Joined: Fri Feb 13, 2015 8:08 pm
Re: '67.5 SPL311 1600 Roadster Restoration: Let the fun begin!
Florida Roadster wrote: ↑Thu Nov 17, 2022 4:36 pm Did I ever mention that I hate sand(glass)blasting?
IMG-3296.jpg
Then you simply need a bigger tip and bigger compressor,
located in Chester NH
1967 1600 in restoration
2013 Arctic Cat F-1100 turbo
Ford F-350 6.0
Ford 9000 puller, Ford 960 puller, Ford 901show, Ford 971 worker, Oliver 70 waiting its turn
1967 1600 in restoration
2013 Arctic Cat F-1100 turbo
Ford F-350 6.0
Ford 9000 puller, Ford 960 puller, Ford 901show, Ford 971 worker, Oliver 70 waiting its turn
-
Florida Roadster
- Site Supporter
- Posts: 341
- Joined: Tue Apr 12, 2022 6:08 pm
- Location: Tampa, FL
- Model: 1500/1600
- Year: Low Windshield-64-67.5
Re: '67.5 SPL311 1600 Roadster Restoration: Let the fun begin!
You are 100% correct on that one. I actually rented a bigger gas-powered compressor from home depot last weekend when I did the frame and body. Sadly though It was only marginally better than my compressor. It had a higher CFM but was still lacking in capacity. Halfway through the day I had an idea, piggybacking both compressors at the same time. I made a "T" fitting and hooked both together and it was much better. All of the smaller parts I have been doing in the benchtop blast cabinet so capacity is not as much of an issue. Enjoying life!
-Jeff-
1967.5 SPL311 Datsun Roadster 1600/2000 (Full Restoration Project)
1970 Triumph GT6+ (Full Restoration Project. Waiting up on the shelf.)
1967.5 SPL311 Datsun Roadster 1600/2000 (Full Restoration Project)
1970 Triumph GT6+ (Full Restoration Project. Waiting up on the shelf.)
-
Florida Roadster
- Site Supporter
- Posts: 341
- Joined: Tue Apr 12, 2022 6:08 pm
- Location: Tampa, FL
- Model: 1500/1600
- Year: Low Windshield-64-67.5
Re: '67.5 SPL311 1600 Roadster Restoration: Let the fun begin!
Question. On what appears to be the self-canceling turn signal mechanism on the turn signal stalk, there is a small spring. It's connected on both ends and is currently BEHIND the tab in the picture. Is this the correct position or should it be in FRONT of the tab? The spring is a little stretched and I may just try to replace it anyway. Thanks!
You do not have the required permissions to view the files attached to this post.
-Jeff-
1967.5 SPL311 Datsun Roadster 1600/2000 (Full Restoration Project)
1970 Triumph GT6+ (Full Restoration Project. Waiting up on the shelf.)
1967.5 SPL311 Datsun Roadster 1600/2000 (Full Restoration Project)
1970 Triumph GT6+ (Full Restoration Project. Waiting up on the shelf.)
-
Florida Roadster
- Site Supporter
- Posts: 341
- Joined: Tue Apr 12, 2022 6:08 pm
- Location: Tampa, FL
- Model: 1500/1600
- Year: Low Windshield-64-67.5
Re: '67.5 SPL311 1600 Roadster Restoration: Let the fun begin!
Polished my knob. (Insert Beavis and Butthead comments)  It was in bad shape to begin with. I mounted it in the drill press and used varying grits of sandpaper and polish. I wanted to keep and use the original knob rather than replace it. Not perfect, but nice and smooth.
You do not have the required permissions to view the files attached to this post.
-Jeff-
1967.5 SPL311 Datsun Roadster 1600/2000 (Full Restoration Project)
1970 Triumph GT6+ (Full Restoration Project. Waiting up on the shelf.)
1967.5 SPL311 Datsun Roadster 1600/2000 (Full Restoration Project)
1970 Triumph GT6+ (Full Restoration Project. Waiting up on the shelf.)
-
Florida Roadster
- Site Supporter
- Posts: 341
- Joined: Tue Apr 12, 2022 6:08 pm
- Location: Tampa, FL
- Model: 1500/1600
- Year: Low Windshield-64-67.5
Re: '67.5 SPL311 1600 Roadster Restoration: Let the fun begin!
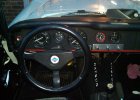
I'm working on restoring my gauges. I removed the bezels from the speedo and tach and will paint them later and re-install them last. I've re-painted the needles on the speedo and tach as the original paint had dried up and flaked off. I had to clean and touch up a few other areas. Cleaned all the internal mechanisms with an electronic cleaner and inspected everything. Re-greased the speedo gears, and new rubber O-ring around the reset button shaft. Tested with a low-speed drill and movement is good. Disassembled the remaining three gauges, cleaned up the glass, cleaned the mechanisms, inspected, re-painted the white needles, painted the bezels, and re-assembled with new sealant. So far they look pretty good with just a little "patina" to them. Set the clock at 5:00 for now since "it's 5:00 O'clock somewhere!"  My question for the day is this. Does anyone know the material used for the insulators on the back screws of the gauges? See pic. They are dried and flaky and I would like to replace them on all the gauges. Thanks!
You do not have the required permissions to view the files attached to this post.
-Jeff-
1967.5 SPL311 Datsun Roadster 1600/2000 (Full Restoration Project)
1970 Triumph GT6+ (Full Restoration Project. Waiting up on the shelf.)
1967.5 SPL311 Datsun Roadster 1600/2000 (Full Restoration Project)
1970 Triumph GT6+ (Full Restoration Project. Waiting up on the shelf.)