SPL311-18278
Moderators: notoptoy, S Allen, Solex68
-
Steve_69
- Roadster Fanatic
- Posts: 174
- Joined: Fri Sep 11, 2020 7:37 pm
- Location: Knoxville, TN
- Model: 1500/1600
- Year: High Windshield-68-70
Re: SPL311-18278
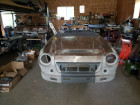
Got the engine and transmission installed. Also, I had the rear leaf spring shackles upside down and had to address that. Need to do the driveshaft and then start on the bodywork.
You do not have the required permissions to view the files attached to this post.
-
Gregs672000
- Roadster Fanatic-Site Supporter
- Posts: 9002
- Joined: Fri Aug 07, 2009 11:47 pm
- Location: Tacoma, WA
Re: SPL311-18278
Looks great Steve! So fun when things start coming together... onward!
Greg Burrows
'67 2000 #588
Tacoma, WA
'67 2000 #588
Tacoma, WA
-
Steve_69
- Roadster Fanatic
- Posts: 174
- Joined: Fri Sep 11, 2020 7:37 pm
- Location: Knoxville, TN
- Model: 1500/1600
- Year: High Windshield-68-70
Re: SPL311-18278
Yesterday, I managed to get the body off of the overhead dolly and mount the it onto a rotisserie. A little more work and I will be ready for wet blasting!
You do not have the required permissions to view the files attached to this post.
-
Steve_69
- Roadster Fanatic
- Posts: 174
- Joined: Fri Sep 11, 2020 7:37 pm
- Location: Knoxville, TN
- Model: 1500/1600
- Year: High Windshield-68-70
Re: SPL311-18278
Well, not the best of mornings. I thought (and everyone else who has looked at the car thought) that at least the floorboards are in very good condition. Just a couple of small patches, clean it up and paint the floor and good to go. Well, I started buffing it off from underneath and this is what I found. The light blue spots are daylight.  My guess is it rusted from the undercoat t the inside because you could not see evidence of holes from inside the car. I guess I will be ordering me some floor tins. $$Cha-ching!$$
You do not have the required permissions to view the files attached to this post.
-
Steve_69
- Roadster Fanatic
- Posts: 174
- Joined: Fri Sep 11, 2020 7:37 pm
- Location: Knoxville, TN
- Model: 1500/1600
- Year: High Windshield-68-70
Re: SPL311-18278
It has taken some doing, but I have removed the first section of floor and installed new. I have been learning a lot about sheet metal welding in the process, and that it is not easy. Butt welding sheet metal takes a lot of time and patience. Also, every time you think you have it done, you find more pin holes. I have not yet put in the seat braces nor captured nuts for the E-brake bracket. I will do that much later. Anyway, after 6 weeks on the first section (~6-10 hours per week) I think the others will go a little faster.
You do not have the required permissions to view the files attached to this post.
-
iloveredmeat
- Roadster Nut-Site Supporter
- Posts: 788
- Joined: Thu Aug 08, 2019 3:36 pm
- Location: San Diego
- Model: 1500/1600
- Year: Low Windshield-64-67.5
Re: SPL311-18278
Man, that looks really good! I admire you for learning how to do that.
My friend who welded in some small floor patches said the same thing, it's delicate... slow and patient. I believe he settled on doing small 'tack welds' every few inches and then coming back around and filling in the gaps once the last weld had cooled down a bit, and on and on until he completed it.
And regarding tiny pinholes, @JT68 once posted what seems like a great idea... a small patch of metal tape and then epoxy over that. Eliminates the risk of burning the hole any larger.
Nice work!
pm
Peter
––
1967.5 1600 – Second Owner – Under Reconstruction
1970 Honda CT70
1953 Airstream 21' Flying Cloud – Second Owner
––
1967.5 1600 – Second Owner – Under Reconstruction
1970 Honda CT70
1953 Airstream 21' Flying Cloud – Second Owner
-
Steve_69
- Roadster Fanatic
- Posts: 174
- Joined: Fri Sep 11, 2020 7:37 pm
- Location: Knoxville, TN
- Model: 1500/1600
- Year: High Windshield-68-70
Re: SPL311-18278
Thanks for the nice words. I am using stich-welding where I put down a tack and move down an inch and make another and so on. Yes, I burn holes in the old sheet metal every now and then and have to use a copper backing plate to fill it. Going forward, I am thinking about doing some as lap welds and then using seam sealer since I will need to use sealer where the plug weld seams are anyway. Time will tell.
I am really concerned about the front pan section because there are MANY hole that wrap up to the vertical section. I am not sure how to bend a corrugated sheet without losing its dimensions, or I could just split the corrugations and seam them back after bending into place. Any advice from the experts would be welcomed....
I am really concerned about the front pan section because there are MANY hole that wrap up to the vertical section. I am not sure how to bend a corrugated sheet without losing its dimensions, or I could just split the corrugations and seam them back after bending into place. Any advice from the experts would be welcomed....
-
Danjo55
- Roadster Newby
- Posts: 10
- Joined: Sun Apr 18, 2021 5:08 pm
- Location: Ft Worth
- Model: 2000
- Year: High Windshield-68-70
Re: SPL311-18278
I just opened this post and have not read any other yet but want to ask, Where did you purchase your floor pans?
thank you, I have started on my 68 2000. I have a long way to go before I get to the body. The frame is almost ready for sandblast and paint.
thank you, I have started on my 68 2000. I have a long way to go before I get to the body. The frame is almost ready for sandblast and paint.
-
Steve_69
- Roadster Fanatic
- Posts: 174
- Joined: Fri Sep 11, 2020 7:37 pm
- Location: Knoxville, TN
- Model: 1500/1600
- Year: High Windshield-68-70
Re: SPL311-18278
I got the floor pan sections from Ross Mullen (https://sportsimports.ca). I should let you know that they are not a drop in set of pans like you might expect for a Camero or Mustang, but still I appreciate having the ability to purchase something that has much of the work done for you at (what I would consider) a fair price. Good Luck. I hope to have my car on the road by this time next year.
-
Steve_69
- Roadster Fanatic
- Posts: 174
- Joined: Fri Sep 11, 2020 7:37 pm
- Location: Knoxville, TN
- Model: 1500/1600
- Year: High Windshield-68-70
Re: SPL311-18278
I finished the 1st floor section including the seat braces, E-brake captured nuts, seam sealer and primed. 3 more sections to go.
I've been busy this morning cutting away some more rust. I will need to do some cleaning up on it, then start hammering out the end caps for the rocker before I start putting things back (Someone should make replacements for these). Also, I need to repair the top of the door sill that has some rust holes.
I've been busy this morning cutting away some more rust. I will need to do some cleaning up on it, then start hammering out the end caps for the rocker before I start putting things back (Someone should make replacements for these). Also, I need to repair the top of the door sill that has some rust holes.
You do not have the required permissions to view the files attached to this post.
-
Bwk2000

- Roadsteraholic
- Posts: 912
- Joined: Mon Aug 23, 2021 3:09 pm
- Location: Halifax, Nova Scotia
- Model: 1500/1600
- Year: High Windshield-68-70
Re: SPL311-18278
Coming along nicely Steve. 

Kai
Halifax, N.S.
’69 SPL311 Sports 1600
Classic Cars - Because clean fingernails, free weekends, intact knuckles and financial stability are totally overrated.
Halifax, N.S.
’69 SPL311 Sports 1600
Classic Cars - Because clean fingernails, free weekends, intact knuckles and financial stability are totally overrated.
-
Steve_69
- Roadster Fanatic
- Posts: 174
- Joined: Fri Sep 11, 2020 7:37 pm
- Location: Knoxville, TN
- Model: 1500/1600
- Year: High Windshield-68-70
Re: SPL311-18278
I made a new rear endcap for the driver's side rocker. It does not exactly match the original, but should provide the structural strength needed. It was a real PITA, however I got into this project to learn some new skills. Therefore, I welcome the challenge. As you can see the original was in very bad shape. I made a 1st cut template, then a final and then built the metal piece. I have everything ground down and ready for welding tomorrow. I also made a rear endplate. I should get the welding done tomorrow for the end plates, the rocker, the rear end cap, and the repaired door sill. Then I will have to start hammering out the repair patch for the front endcap. And to think, I have to do this all over again for the other side!
You do not have the required permissions to view the files attached to this post.
-
iloveredmeat
- Roadster Nut-Site Supporter
- Posts: 788
- Joined: Thu Aug 08, 2019 3:36 pm
- Location: San Diego
- Model: 1500/1600
- Year: Low Windshield-64-67.5
Re: SPL311-18278
Wow!
It's so cool that you're learning and fabbing this on your own.
I'm way more impressed than the cat seems to be.
Good on ya,
Peter
It's so cool that you're learning and fabbing this on your own.
I'm way more impressed than the cat seems to be.
Good on ya,
Peter
Peter
––
1967.5 1600 – Second Owner – Under Reconstruction
1970 Honda CT70
1953 Airstream 21' Flying Cloud – Second Owner
––
1967.5 1600 – Second Owner – Under Reconstruction
1970 Honda CT70
1953 Airstream 21' Flying Cloud – Second Owner
-
Steve_69
- Roadster Fanatic
- Posts: 174
- Joined: Fri Sep 11, 2020 7:37 pm
- Location: Knoxville, TN
- Model: 1500/1600
- Year: High Windshield-68-70
Re: SPL311-18278
Here is the finished rocker on the passenger side. Also I had to fabricate a new footwell section on the driver's side along with a number of patches to the kick panel and a portion of the transmission tunnel. Dead pedal is blasted and installed to. I still have some butt welding to do to finish these off, but I should be putting the front floor in the driver side next week.
You do not have the required permissions to view the files attached to this post.
-
S Allen
- Site Admin
- Posts: 4542
- Joined: Thu Dec 05, 2002 4:57 pm
- Location: Knoxville, IA(Lake Redrock)Emory, TX
- Model: 1500/1600
- Year: Low Windshield-64-67.5
- Contact:
Re: SPL311-18278
Very nice work indeed. Great skills.
S
S
66 Stroker-Going Orange
67 SRL311-00279-resto project
Stock '72 240Z-Blue
2002 Ford F250 7.3 Diesel 2WD Hauler
2008 Toyota FJ Cruiser
2009 Smart ForTwo Passion Coupe
2013 Fiat 500 Abarth
67 SRL311-00279-resto project
Stock '72 240Z-Blue
2002 Ford F250 7.3 Diesel 2WD Hauler
2008 Toyota FJ Cruiser
2009 Smart ForTwo Passion Coupe
2013 Fiat 500 Abarth