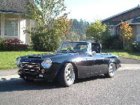
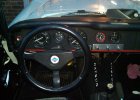
I have definitely done a LOT since my last actual update with pictures back in January, but it was a pretty rough summer for me, unfortunately. Not too much has happened on the car since my last post back in June mentioning brake lines and such aside from chipping away at the engine wiring harness. I ended up staying at my current job, and taking on a pretty massive project that I was given full ownership of. The workload and responsibilities have been tremendous, and the deadlines have been tight.
Most of my time away from work went towards my family and providing the end of life care for my beloved lab-mix Otto, who I had to have put down in August. I loved that dog and it really messed me up having to go through with that. I got him back in college a couple months before picking up the Roadster, so he was my garage companion for the past 12 years. Aside from when I was grinding, welding, or painting, he was always right next to me during the whole build. It's just a horrible empty feeling going out there without him, and combined with all the crazy work stuff, as well as the consistent 105+ degree temperatures we had down here in Texas, I just haven't touched the car.
My workload should ease up by mid-January or so as I get all of the stuff I am designing into production to stay on the projected timeline. Combine that with the cold temperatures I prefer, and I should be back in business on this thing early next year. I do have quite a few pictures that I have reduced to the size needed to post here, so I will break all that up into a few posts that I will try and get posted between all the Halloween stuff I have scheduled with the kiddos this weekend.