Centre Console & Ashtray Cover

Place to put those little tricks or parts you used during the restoration of your roadster.

Moderators: notoptoy, S Allen, Solex68

User avatar
brubojacru
Site Supporter
Posts: 73
Joined: Tue Jan 25, 2011 9:53 pm
Location: Regina, SK Canada

Centre Console & Ashtray Cover

Post by brubojacru »

I'm in the process of restoring the centre console in my '69 2000. The metal trim around the ashtray and the ashtray cover were a bit corroded and in need of a new finish. The original paint was kind of silver, but I decided to try Dupli-Color Chrome and was pretty pleased with the results, although the parallel trim lines on the ashtray cover have disappeared. I expect this would happen with most any paint product though.

Before
http://311s.org/Gallery/albums/userpics/12552/CIMG4873.jpg

After
http://311s.org/Gallery/albums/userpics/12552/CIMG4897.jpg

Thinking of a couple of coats of clear coat for protection might be a good idea.

Bruce
1969 Datsun 2000
2006 Tahoe Z71
User avatar
sports imports
Vendor-Site Supporter
Posts: 1092
Joined: Fri Aug 25, 2006 10:41 am
Location: Surrey, BC
Contact:

Re: Centre Console & Ashtray Cover

Post by sports imports »

The parts came in a metal finish, not paint Your paint choice is very nice. I like the look.

Ross
sports imports
User avatar
brubojacru
Site Supporter
Posts: 73
Joined: Tue Jan 25, 2011 9:53 pm
Location: Regina, SK Canada

Re: Centre Console & Ashtray Cover

Post by brubojacru »

Thanks Ross.

BTW I followed your suggestion of repairing my broken / seized accelerator cable with a bicycle brake cable. I was able to salvage and reuse the cable ends and spring that fit the brackets at the firewall and intake manifold - looks wimpy compared to the original cable but works great!

Bruce
1969 Datsun 2000
2006 Tahoe Z71
User avatar
brubojacru
Site Supporter
Posts: 73
Joined: Tue Jan 25, 2011 9:53 pm
Location: Regina, SK Canada

Re: Centre Console & Ashtray Cover

Post by brubojacru »

UPDATE - Thought an update was in order to maybe save someone else some grief. I really liked the look of the chrome paint, but it really smudged up while installing back into my re-covered console. So I repainted with the chrome paint, and then applied a clear coat for protection. Problem was, the clear coat reacted with the chrome paint turning it a dark gray. After stripping the gray I tried again, same result. So, unless the chrome will be behind glass and never touched, save your time and money!

Next tried Rust-Oleum Metallic which had a nice finish but not as shiny as the Chrome. I was able to apply clear coat over top, so this is what it ended up looking like. The metallic doesn't show up in the pic but it is noticeable.

http://311s.org/Gallery/albums/userpics/12552/CIMG5466.jpg


Here are the products I used.

http://311s.org/Gallery/albums/userpics/12552/CIMG5458.jpg


Hope this saves someone a headache.
Bruce
1969 Datsun 2000
2006 Tahoe Z71
User avatar
ACote
Roadsteraholic
Posts: 781
Joined: Mon Mar 28, 2011 11:01 pm
Location: Winnweiler, Germany
Model: 2000
Year: High Windshield-68-70
Contact:

Re: Centre Console & Ashtray Cover

Post by ACote »

I had the same problem with the chrome paint. not worth it.
User avatar
jrusso07
Roadsteraholic
Posts: 1694
Joined: Sat Aug 02, 2008 9:02 am
Location: Penn Yan, NY
Model: 2000
Year: High Windshield-68-70

Re: Centre Console & Ashtray Cover

Post by jrusso07 »

Nice!

I used the metallic paint for same but didn't clear coat it. It turns darker, grayish over time...I'd expect the clear coat will protect it from aging.
Joe

1969 SRL311 - Solex
1970 SPL311 - U20 mod
1970 SRL311
User avatar
ACote
Roadsteraholic
Posts: 781
Joined: Mon Mar 28, 2011 11:01 pm
Location: Winnweiler, Germany
Model: 2000
Year: High Windshield-68-70
Contact:

Re: Centre Console & Ashtray Cover

Post by ACote »

I forgot to mention I also have had good luck with the metallic. I did my front bumper metallic until I can get it chromed. Put a good clear on it and it still looks great.
User avatar
markjhatch
Roadster Fanatic
Posts: 209
Joined: Mon Sep 26, 2011 2:25 pm
Location: Moraga, CA

Re: Centre Console & Ashtray Cover

Post by markjhatch »

Just to clarify... When you said Rust-Oleum Metallic, you meant Rust-Oleum *Silver* Metallic? Correct?

Thanks

Mark
69'2000
Previous owner won the car in a poker game in Colorado -- he should have folded while he was ahead...
User avatar
Solex68
Site Supporter
Posts: 2089
Joined: Fri May 25, 2012 3:30 pm
Location: Laguna Hills, CA
Model: 2000
Year: High Windshield-68-70
Contact:

Re: Centre Console & Ashtray Cover

Post by Solex68 »

Did you re-cover the center console? If so, can you show some close-ups or give hints on how to do it or where to start?
Greg a.k.a SOLEX68 - http://www.datsunvents.com/
Laguna Hills, CA
68 2000
Always willing to help another Datsun Roadster owner
Pending installs: All steering components, Stan Stealth Dizzy
User avatar
markjhatch
Roadster Fanatic
Posts: 209
Joined: Mon Sep 26, 2011 2:25 pm
Location: Moraga, CA

Re: Centre Console & Ashtray Cover

Post by markjhatch »

I purchased a hard plastic cover, (like those provided for a 68+ dash by everyone) from Dean. (But I suspect you can buy it from other roadster suppliers). It was a simple matter of dis-assembly, trimming the cracks, a little filling of holes with bondo, and then gluing it on with gorilla glue. Looks great and it included a new arm rest too.

Mark
69'2000
Previous owner won the car in a poker game in Colorado -- he should have folded while he was ahead...
User avatar
spl310
Roadster Guru
Posts: 13215
Joined: Sun Dec 29, 2002 10:38 pm
Location: In front of this keyboard... in Jacksonville, Florida!

Re: Centre Console & Ashtray Cover

Post by spl310 »

Mark, post some pics. Before and after would be awesome.
"Wow, a Roadster!" Stuart Little

1967.5 2000
1967.5 2000
1964 1500
1964 1500
1967.5 1600
1968 chassis
2006 Acura MDX
2013 Volkswagen Jetta TDI wagon
1995 F350 Powerstroke!
More...
User avatar
brubojacru
Site Supporter
Posts: 73
Joined: Tue Jan 25, 2011 9:53 pm
Location: Regina, SK Canada

Re: Centre Console & Ashtray Cover

Post by brubojacru »

I haven't checked back here for awhile, and I see Mark hasn't posted any pics so I'll share some of mine. I used the plastic vacuum formed console cover from Dean too. The fit was generally good but my method of clamping & gluing was a bit shaky as you'll see. I decided to do the console first before tackling the dash and glove box, and am I ever glad I did!

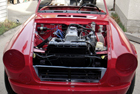
My console was in pretty rough shape and very brittle:

http://311s.org/Gallery/albums/userpics/12552/IMG_3626.jpg

I started with the armrest lid

http://311s.org/Gallery/albums/userpics/12552/CIMG4906.jpg

My plan was to pre-shape the cover by bending the edges over the lids edges

http://311s.org/Gallery/albums/userpics/12552/CIMG4905.jpg

I first cut away the flaky edges of the cracks and applied body filler for an even surface

http://311s.org/Gallery/albums/userpics/12552/CIMG4907.jpg

Then using the silicone adhesive supplied with the cover I glued the cover on and clamped it every which way I could, using wax paper to avoid gluing the wood strips to the new cover.

http://311s.org/Gallery/albums/userpics/12552/CIMG4914.jpg

Then I tried gluing the sides and the front edge overlap which is most visible. I found using metal strips a better method as the silicone didn't stick to it but any squeeze out was left very flat and smooth.

http://311s.org/Gallery/albums/userpics/12552/CIMG4923.jpg

The angles on the lid made it impossible to glue everything at once. After a trial fit with the console cover in place but not yet glued, I realized that there was no way I could overlap the sides and the back edge needed to be trimmed.

http://311s.org/Gallery/albums/userpics/12552/CIMG5295.jpg

After notching out the rear edge I realized that the original was not square but the cover was.

http://311s.org/Gallery/albums/userpics/12552/CIMG5304.jpg

More clamping required.

http://311s.org/Gallery/albums/userpics/12552/CIMG5311.jpg

Then I carefully trimmed the edges flush to the lid bottom with my angle grinder. Then another trial fit with hinges and latch after slotting the bolt holes in both.

http://311s.org/Gallery/albums/userpics/12552/CIMG5350.jpg

Then I went to work on the console cutting away flaky plastic and applying body filler.

http://311s.org/Gallery/albums/userpics/12552/CIMG4895.jpg

On one side the original base foam had lifted away from the metal and had to be re-glued.

http://311s.org/Gallery/albums/userpics/12552/CIMG4902.jpg

This created a concave area which had to be filled.

http://311s.org/Gallery/albums/userpics/12552/CIMG4921.jpg

After several trial fittings I realized that the front areas around the ashtray and shifter needed to be built up to fill the spaces under the cover.

http://311s.org/Gallery/albums/userpics/12552/CIMG4929.jpg

Time to glue on the cover. I didn't think I could clamp everywhere at once so I used some lengths of thin bungee cord and wrapped it up .

http://311s.org/Gallery/albums/userpics/12552/CIMG4934.jpg

This wasn't as successful as I'd hoped. I should have used strips of wood or something along the bottom edges since I got some bulging between where the cords were. And there wasn't an even distribution of adhesive so these edges had to be redone and clamped anyway.

http://311s.org/Gallery/albums/userpics/12552/CIMG5291.jpg

The area around the shifter was difficult to hold in place and had to be re-glued as well.

http://311s.org/Gallery/albums/userpics/12552/CIMG5292.jpg

Once finished I cleaned thoroughly with ammonia and even resorted to acetone to get rid of the silicone mess I made through all this. This dulled the cover but I planned on spraying all the new parts and any vinyl or black pieces not being replaced with a black SEM interior semi-gloss product anyway. Here it is painted.

http://311s.org/Gallery/albums/userpics/12552/CIMG5465.jpg

In the end I was pleased with the results.

Regards,
Bruce
1969 Datsun 2000
2006 Tahoe Z71
User avatar
Solex68
Site Supporter
Posts: 2089
Joined: Fri May 25, 2012 3:30 pm
Location: Laguna Hills, CA
Model: 2000
Year: High Windshield-68-70
Contact:

Re: Centre Console & Ashtray Cover

Post by Solex68 »

Excellent write up ! I am considering purchasing the same cover.
Greg a.k.a SOLEX68 - http://www.datsunvents.com/
Laguna Hills, CA
68 2000
Always willing to help another Datsun Roadster owner
Pending installs: All steering components, Stan Stealth Dizzy
User avatar
68DSU
Roadster Fanatic-Site Supporter
Posts: 1000
Joined: Thu Nov 03, 2011 10:02 am
Location: Fair Oaks, Ca.
Model: 1500/1600
Year: High Windshield-68-70

Re: Centre Console & Ashtray Cover

Post by 68DSU »

Wow! Great job! My box cover had been redone previously because of the "elbow spot" in a soft vinyl / leather so I had to try and recreate the original size and consistancy. My suggestion to anyone doing this is to use the stock shape with the messed up "foam" as much as possible.
IMO Bruce's prep work was the key to the excellent result.
Rick
Constantly working on the Datsun whenever I get around to it.

1968 SPL 311
1987 Toyota MR2 T-top (don't hate, wife's car)
2014 Ford Mustang convertible
SPF 50
User avatar
brubojacru
Site Supporter
Posts: 73
Joined: Tue Jan 25, 2011 9:53 pm
Location: Regina, SK Canada

Re: Centre Console & Ashtray Cover

Post by brubojacru »

Thanks guys. Here is the SEM product I used on the finished console and the recovered dash too. I highly recommend this stuff. It covers evenly and dries rapidly. I sprayed the shift plate and the vinyl boot and now they also look like new. The vacuum formed plastic pieces were quite shiny and with the satin black they now look almost like leather.

http://311s.org/Gallery/albums/userpics/12552/CIMG5504.jpg

Bruce.
1969 Datsun 2000
2006 Tahoe Z71
Post Reply