Altima Vented Rotors
Moderators: notoptoy, S Allen, Solex68
-
mklotz70
- Roadster Fanatic
- Posts: 126
- Joined: Mon Sep 13, 2010 11:01 pm
- Location: Gresham, OR
- Contact:
Re: Altima Vented Rotors
I've been fairly quiet about these because I only had one more set of spacers that are just right. I'm going to eat it on the others and have more done. The metal is ordered and they'll be machined next week.......another $500+, but if I don't have it done, I lose all the $'s that are already spent on them. Anyway....I have one set ready to go and I'll have more in another week or so.
Don't have to be too bright to be me!
http://www.bluehandsinc.com
http://www.bluehandsinc.com
-
mklotz70
- Roadster Fanatic
- Posts: 126
- Joined: Mon Sep 13, 2010 11:01 pm
- Location: Gresham, OR
- Contact:
Re: Altima Vented Rotors
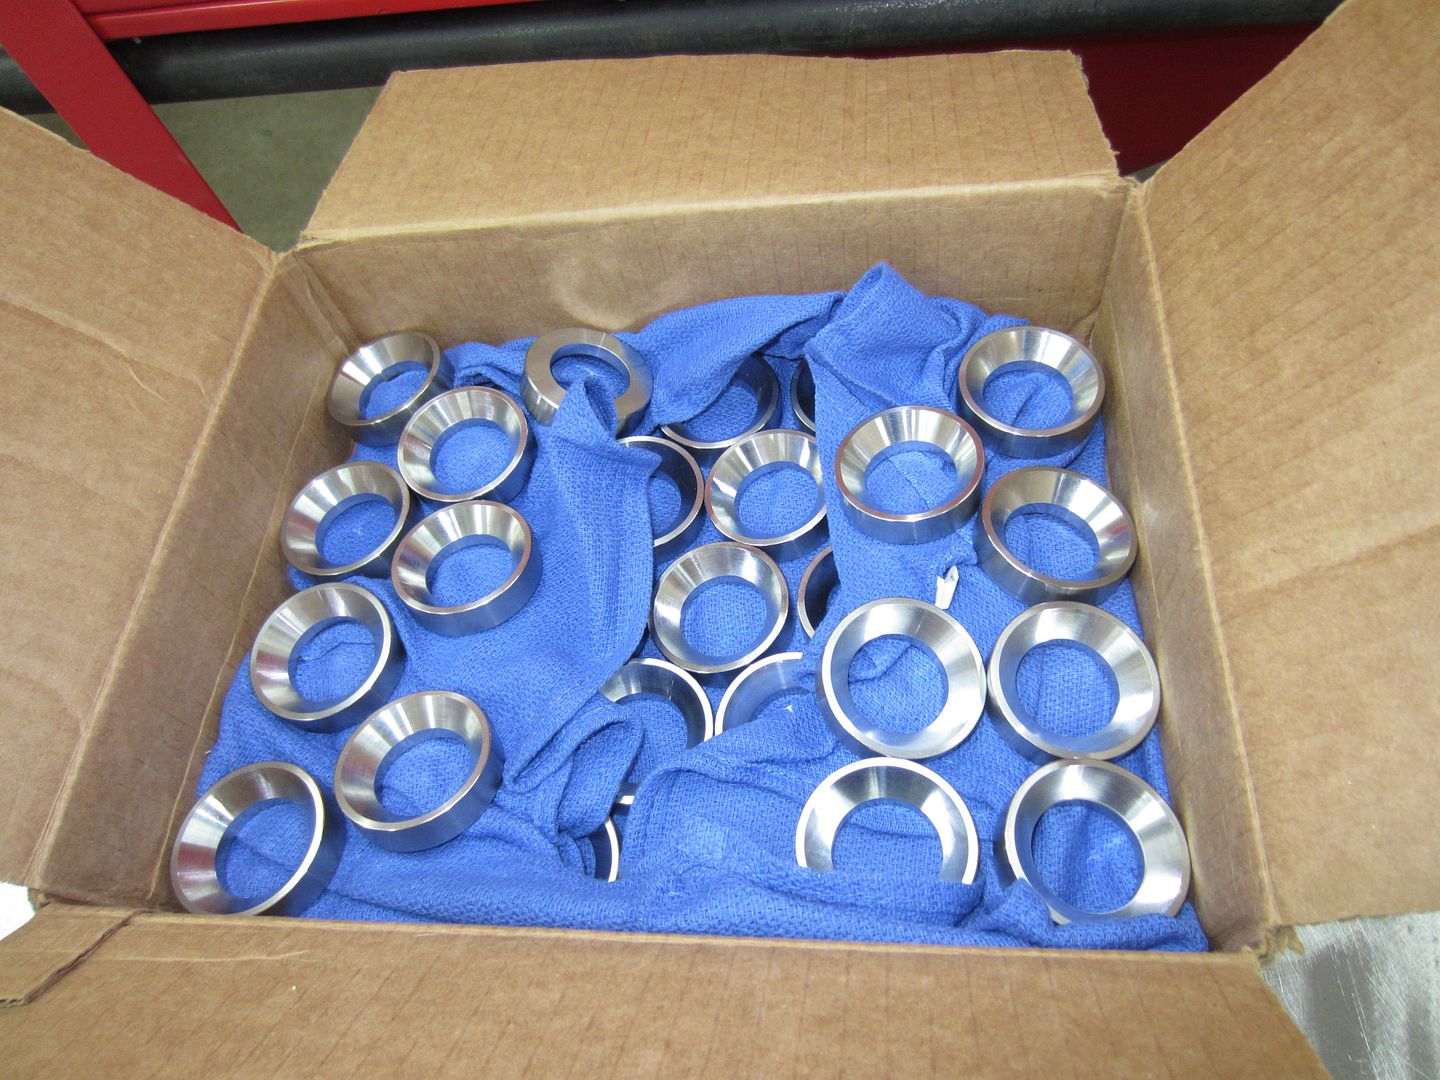
I've received the bearing spacers from the cnc shop. They came out awesome! I even shot some vid of one being cut, but I haven't looked at it yet to see if anything can be seen through the coolant.
I've got 21 sets of bearing spacers now.....somewhere around 10 sets of caliper spacers and 4 sets of rotors. I'll start boxing them up in the next few days and have a better count on just how many I have.
I'll put some pics and vid up when I get a chance. Just spent the last 5 hours fighting with my CAD program. Finally got it working again, so now I have to print some files and get in the shop
Don't have to be too bright to be me!
http://www.bluehandsinc.com
http://www.bluehandsinc.com
-
mklotz70
- Roadster Fanatic
- Posts: 126
- Joined: Mon Sep 13, 2010 11:01 pm
- Location: Gresham, OR
- Contact:
Re: Altima Vented Rotors
Been busy on a belt grinder project. I finally got around to putting up the short vid of the roadster bearing spacer being machined. I enjoy watching cnc machines do their thing.....I thought somebody else might enjoy it too.
" onclick="window.open(this.href);return false;
" onclick="window.open(this.href);return false;
Don't have to be too bright to be me!
http://www.bluehandsinc.com
http://www.bluehandsinc.com
-
mklotz70
- Roadster Fanatic
- Posts: 126
- Joined: Mon Sep 13, 2010 11:01 pm
- Location: Gresham, OR
- Contact:
Re: Altima Vented Rotors
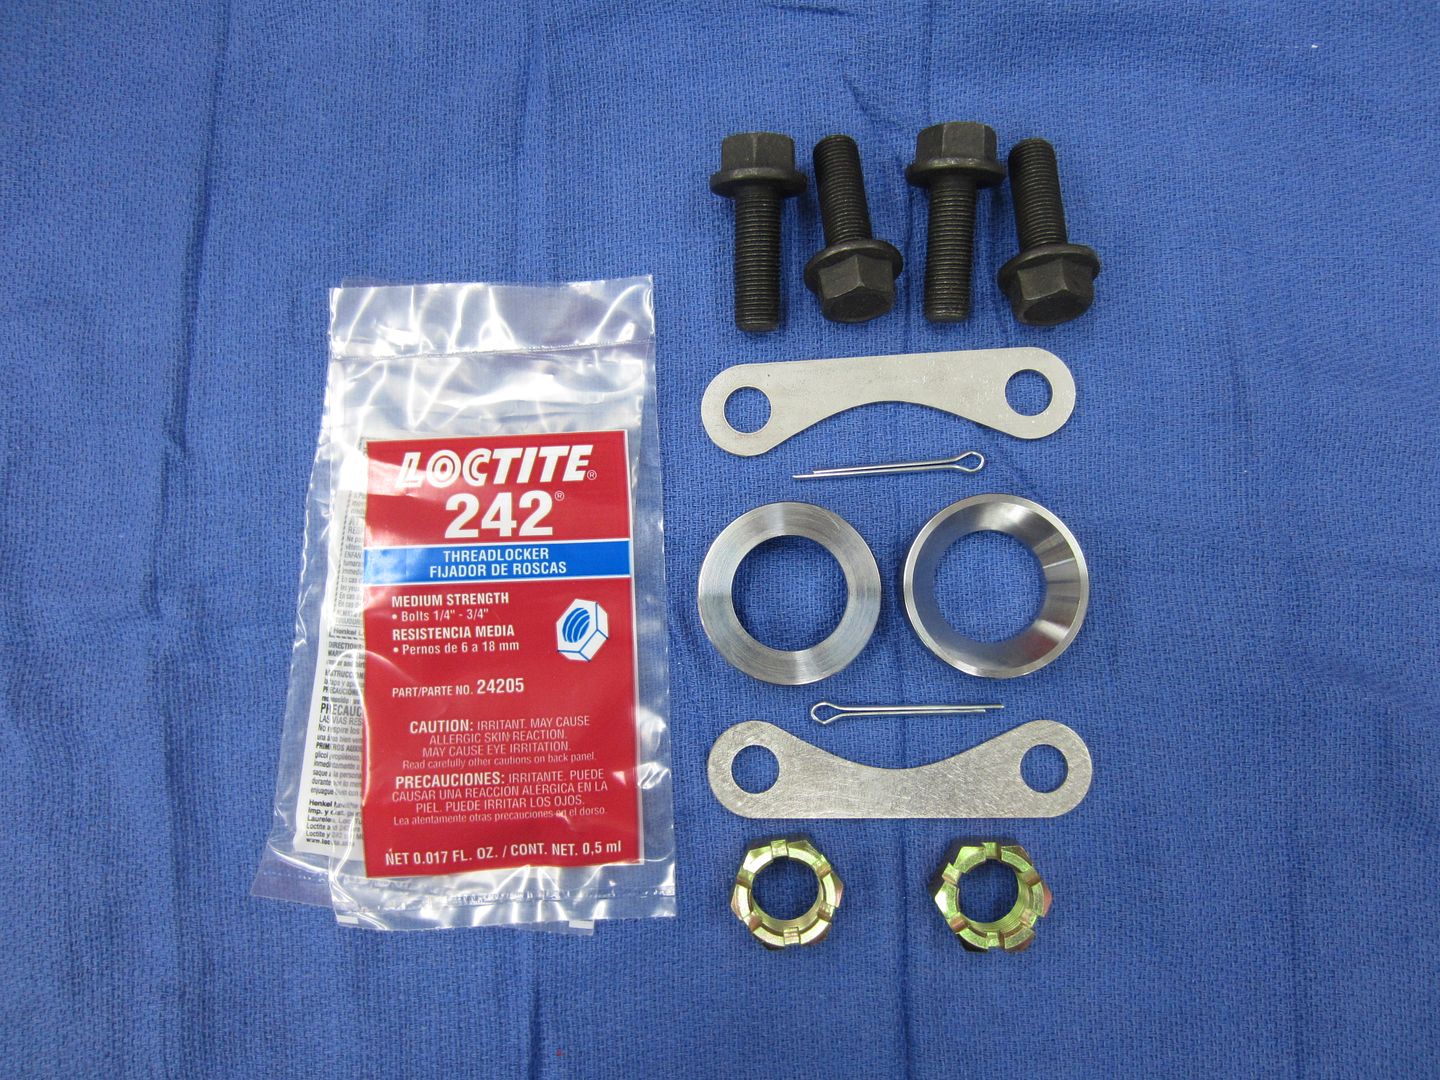
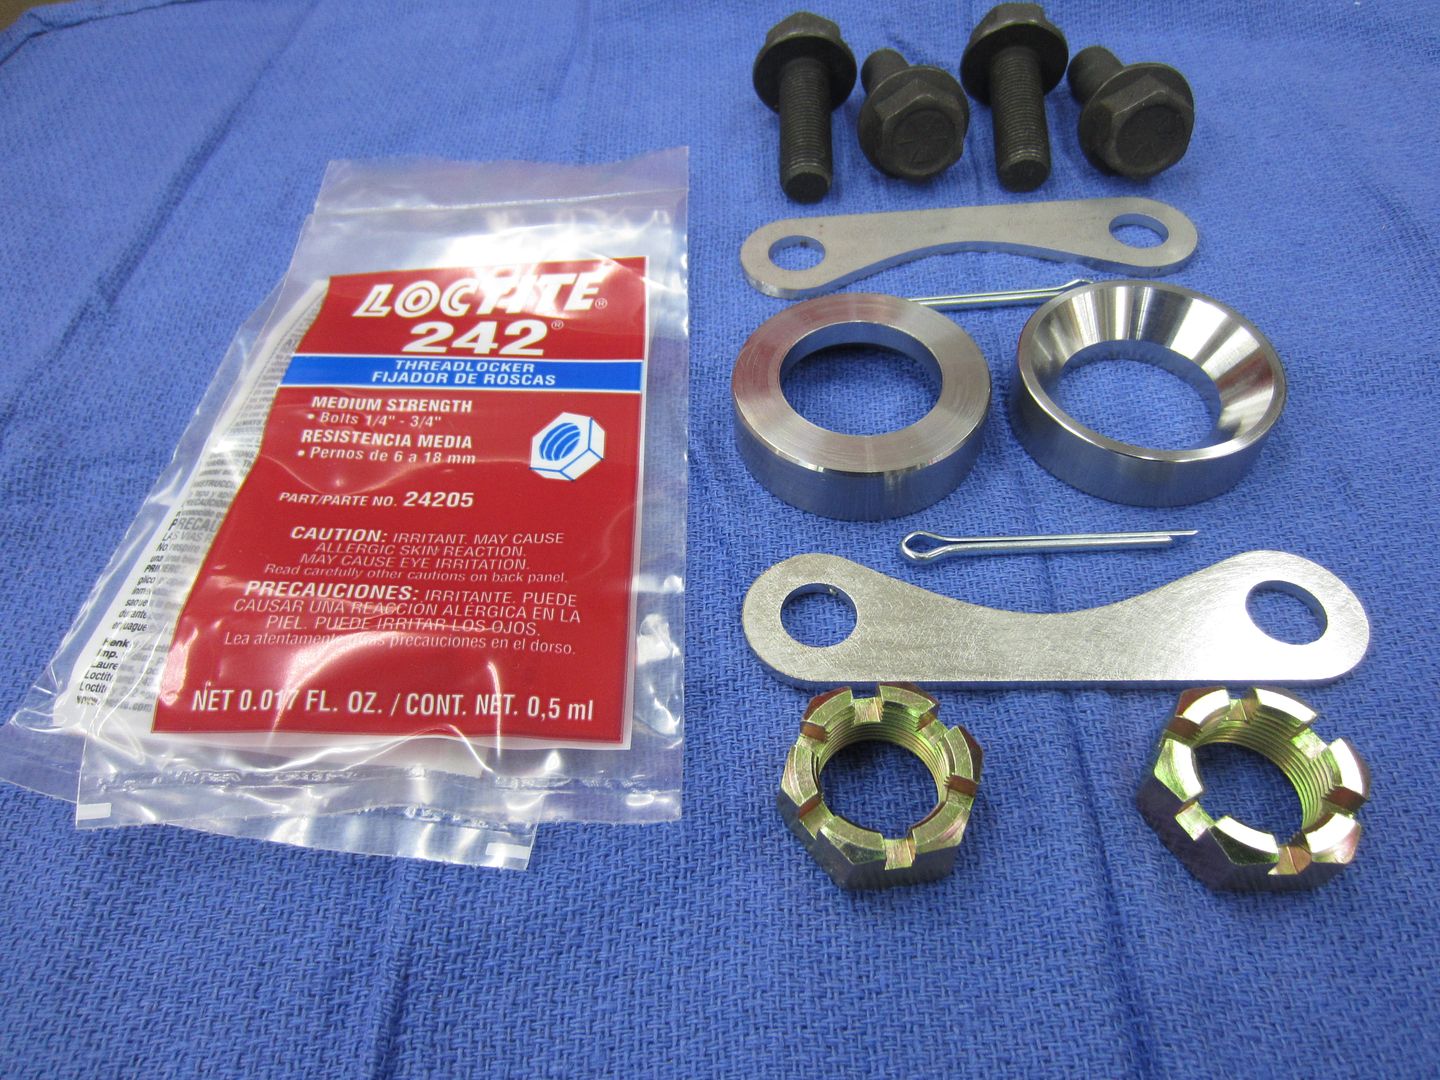
Current pics of the kit parts. Link to my site in the signature if you want more info.
Don't have to be too bright to be me!
http://www.bluehandsinc.com
http://www.bluehandsinc.com
-
311 junkie
Re: Altima Vented Rotors
Will these 4 lug altima rotors work? (Yes they are 4 lug- I asked  )They are sold in pairs, and I have these rotors on my Odyssey mini van- it stops on a dime!
http://www.ebay.com/itm/400336721683?it ... 23&vxp=mtr" onclick="window.open(this.href);return false;" onclick="window.open(this.href);return false;" onclick="window.open(this.href);return false;
http://www.ebay.com/itm/400336721683?it ... 23&vxp=mtr" onclick="window.open(this.href);return false;" onclick="window.open(this.href);return false;" onclick="window.open(this.href);return false;
Last edited by 311 junkie on Sat Mar 02, 2013 10:12 pm, edited 1 time in total.
-
mraitch

- Roadsteraholic
- Posts: 3629
- Joined: Mon Oct 02, 2006 7:03 pm
- Location: Lake Balboa (SFV) - CA
- Model: 1500/1600
- Year: High Windshield-68-70
- Contact:
Re: Altima Vented Rotors
OT - but I remember being at LA Machining Show where they turned an aluminum billet into a destroyer - fascinating to watch all the activity - all the little drills etc. and all totally computer controlled.
Peter Harrison
1970 1600 (Stroker) - TOAD SAN (Eliza)
1970 1600 (Stock) - As Yet Unnamed
Lake Balboa (SFV) , California
1970 1600 (Stroker) - TOAD SAN (Eliza)
1970 1600 (Stock) - As Yet Unnamed
Lake Balboa (SFV) , California
-
mklotz70
- Roadster Fanatic
- Posts: 126
- Joined: Mon Sep 13, 2010 11:01 pm
- Location: Gresham, OR
- Contact:
Re: Altima Vented Rotors
Those rotors should work just fine since they list the '96 Altima for fit. You wont' be able to use the ceramic pads, so it seems a bit of a waste.
There's a machine tool expo coming to Portland in March......I'm attending. I love watching that stuff too!!
There's a machine tool expo coming to Portland in March......I'm attending. I love watching that stuff too!!
Don't have to be too bright to be me!
http://www.bluehandsinc.com
http://www.bluehandsinc.com
-
311 junkie
Re: Altima Vented Rotors
Is there a less expensive source for vented rotors? Dont they have to be machined a little?
-
mklotz70
- Roadster Fanatic
- Posts: 126
- Joined: Mon Sep 13, 2010 11:01 pm
- Location: Gresham, OR
- Contact:
Re: Altima Vented Rotors
Yes, they have to have the inner hole opened up to 2.994".....at least that's the spec I use. You'd want to compare it to your hub just to be sure.
Spent a few min googling and searching ebay......found this pair.
http://www.ebay.com/itm/Premium-Perform ... a1&vxp=mtr" onclick="window.open(this.href);return false;
Spent a few min googling and searching ebay......found this pair.
http://www.ebay.com/itm/Premium-Perform ... a1&vxp=mtr" onclick="window.open(this.href);return false;
Don't have to be too bright to be me!
http://www.bluehandsinc.com
http://www.bluehandsinc.com
-
mklotz70
- Roadster Fanatic
- Posts: 126
- Joined: Mon Sep 13, 2010 11:01 pm
- Location: Gresham, OR
- Contact:
Re: Altima Vented Rotors
I just ordered a set. I'll post pics when they show up. I'll cut the hole and and add them to the pile that's for sale. The last cross drilled rotors I had to machine were a pain because there was no machined surface for me to grab with the chuck. The point being that I will not know what their price will be until I know how easy they are to machine.
Don't have to be too bright to be me!
http://www.bluehandsinc.com
http://www.bluehandsinc.com
-
311 junkie
Re: Altima Vented Rotors
I emailed the other seller to see what the cost would be for just the rotors.
-
pletch
- Roadster Fanatic
- Posts: 186
- Joined: Thu Oct 05, 2006 10:26 pm
Re: Altima Vented Rotors
For the people that have done this mod. Was there a difference in the brake pedal travel? I've been bleeding brakes for almost 30 years and I cant figure out why my pedal goes near the floor. I wouldnt think the master cylinder failed while replacing the front calipers. Since there are 3 bleeder screws on each caliper could air be trapped? I have the third bleeder on the top and I assume that is how it should be.
tomorrow I'm going to have a friend manually help me bleed the brakes to see if that helps.
tomorrow I'm going to have a friend manually help me bleed the brakes to see if that helps.
Ken
DATSTER
69 SRL KA24DEsc
04 Honda CRV
13 Kia Soul +
Pleasanton, CA
DATSTER
69 SRL KA24DEsc
04 Honda CRV
13 Kia Soul +
Pleasanton, CA
-
mklotz70
- Roadster Fanatic
- Posts: 126
- Joined: Mon Sep 13, 2010 11:01 pm
- Location: Gresham, OR
- Contact:
Re: Altima Vented Rotors
hhmm.....I'm not familiar with the roadster m/c. I just looked at datsunparts.com's site and it shows a dual circuit m/c with the rear circuit toward the radiator. Like you, I've been doing them at least 30 years and they can still kick my butt sometimes. I'll run through a couple of things that you probably already know, so if anything, it may be info for someone with less experience. I'm certainly not a pro at this, so this is just my 2 cents......but it may only be worth 1....if anything
Let's see.....first off......air in the lines is typically a spongy pedal. Too much travel is loose adjustment. On a dual circuit system, you should at least feel some pressure from at least one circuit if it's good. They're designed to stop the car if one circuit fails completely. So, if the pedal hits the floor, your rear brakes are bad or too loose.
You may want to set the e-brake to eliminate any of the travel on the rear brakes. It could be that when the first circuit(front, near the firewall) collapses as you push the pedal, some of the pressure is absorbed by the second circuit(rear), so your pedal hits the floor before you feel any resistance. If your rear brakes are on the loose side, they'll have more movement. By setting the ebrake, the wheel cylinder will pump up with the first stroke or two and stay that way since the ebrake is holding the shoes in contact with the drums.
You may need to bench bleed the m/c....which can be done in the car. The point of bench bleeding is to get the air out of the m/c...obviously.....but the pedal may not bottom out the piston in the m/c. You'll want the m/c to be close to level. You can jack up the front or rear of the car to get it there. You can disconnect the linkage to the pedal and use a long screwdriver or bar.....you'll need a second person. Crack the brake line or bleed screw open on the m/c circuit you're working on and slowly push the piston all the way in. When the piston stops, tighten the brake line or bleeder. Then release the piston. Do this 2-3x's. You might as well do both circuits while you're at it. Also...while you're under the dash, make sure that you only have a small amount of play in the linkage to the m/c. It should not be pushing on the piston....there should be a tiny bit of wiggle. An 1/8" of linkage travel before contacting the piston is way too much slop.
You can hook up the linkage and bleed the rest with the pedal. When pumping the pedal, about 2 strokes per second is what I do. The pedal needs to travel to both limits.....all the way down, either to resistance or the floor, then all the way up. If it is not allowed all the way up, the piston can't refill with fluid. You don't want to pause too long at the top of the pedal travel or the fluid can back fill into the reservoir. This is another reason I set the ebrake.....I don't have to fight the springs pushing the fluid back when I'm doing the rear circuit. With calipers, the only "spring" pushing back is the rubber dust seal around the piston...which isn't much.
Everyone knows when bleeding brakes, you start with the corner farthest from the m/c. But....technically, it's the longest line from the m/c. So....if the brake lines on a roadster run from the m/c, to the passenger side and then to the rear, the longest line will be the driver's rear. If the rear line runs from the m/c to the rear down the driver's side....it's the passenger rear with the longest line. Once you're gone around the car 3-5x's and you're not getting any air, I don't think it really matters at that point, but it's a good habit to start with the longest line.
I've used my finger as a speed bleeder to get a circuit started. I crack the bleeder valve, put the tip of my finger over it firmly, then have the helper pump the pedal. The air/fluid will push past your finger, but it will seal back up enough to keep air from going back in. You don't want the bleeder valve too loose, or air can get pulled back in around the threads.
I have a simple, home made pressure bleeder that I can use to get the fluid into the lines initially. I have a bug sprayer on a shelf in the shed just waiting to make a bigger/better one with....it's been there for probably 4 years already. lol
Either I'm having a brain fart, or that's about it.
Don't have to be too bright to be me!
http://www.bluehandsinc.com
http://www.bluehandsinc.com
-
shifty
- Roadster Enthusiast
- Posts: 1166
- Joined: Mon Dec 20, 2004 10:56 am
- Location: Portland, OR
- Contact:
Re: Altima Vented Rotors
Hi Ken!
How did you "unite" the two circuits on the Volvo calipers? Did you drill them or use a "Mark Sedlak" manifold?
How did you "unite" the two circuits on the Volvo calipers? Did you drill them or use a "Mark Sedlak" manifold?
Leigh Brooks
http://www.shiftco.com - my blog about cars (and stuff)
Latest post: http://www.shiftco.com/radios/the-test-mule/
67.5 SRL-00139 sleeping
67.5 SPL-11481 suspended animation
67.5 SPL-12961 snoring
67.5 SPL-13622 - H20 PWR!
http://www.shiftco.com - my blog about cars (and stuff)
Latest post: http://www.shiftco.com/radios/the-test-mule/
67.5 SRL-00139 sleeping
67.5 SPL-11481 suspended animation
67.5 SPL-12961 snoring
67.5 SPL-13622 - H20 PWR!
-
pletch
- Roadster Fanatic
- Posts: 186
- Joined: Thu Oct 05, 2006 10:26 pm
Re: Altima Vented Rotors
problem solved. I bled the brakes the old school way with my son operating the brake pedal. (Down, up, down, up, down, up , down, up then pump the pedal and hold it!)
The pedal still seems to feel different than with the stock calipers (a bit softer and lower). I just did my first (careful) test drive and they seem to be working great. I will bleed the brakes again next weekend because I don't like where Volvo puts the brake bleeding screws, it doesnt make sense to have them in the middle of the caliper and one on the top.
I will put a few more miles and rechecks before I try to work them hard enough to see a difference between the stock and Volvo/Nissan combo.
Leigh, I bought "Mark Sedlak" manifolds. They work well and I don't trust my skills drilling into a brake caliper.
I do want to say that Mike has a been a wonderful help with this modification. He had to talk me off the cliff a few times and helped me in the right direction. The quality of his parts and his help made this a positive experience....
Ken
DATSTER
69 SRL KA24DEsc
04 Honda CRV
13 Kia Soul +
Pleasanton, CA
DATSTER
69 SRL KA24DEsc
04 Honda CRV
13 Kia Soul +
Pleasanton, CA