Yellow #8217 Ongoing Improvements
Moderators: notoptoy, S Allen, Solex68
-
bikermike
- Site Supporter
- Posts: 1761
- Joined: Wed Jul 06, 2011 4:06 pm
- Location: Denver Area, CO
- Model: 1500/1600
- Year: Low Windshield-64-67.5
Re: SRL311-08217 Frame-Off Resto COMPLETE!
On the wheels, what was your process for restoring them? I have a set that is similar in style and at some point I'll do something to refinish them. Thanks.
-Mike
1967.5 SPL311
1972 240z / L28
2003 BMW 525i Touring
2014 Jeep KL
1967.5 SPL311
1972 240z / L28
2003 BMW 525i Touring
2014 Jeep KL
-
Speedyshel
- Roadster Fanatic
- Posts: 210
- Joined: Sun Oct 03, 2010 5:47 pm
- Location: Moody, AL
Re: SRL311-08217 Frame-Off Resto COMPLETE!
Here's the exact steps I used. Sorry if it's too much information 
(I bolded the main steps to summarize everything hehe.)
I cleaned them first. I have the use of a media blaster so it made life really easy on that front. Walnut shells and such are soft on aluminum of you're afraid of etching them.
I had a nick on the one where it must've hit a curb by the PO, so I added a spot of weld and cleaned used a dremel and flap wheel to finish it up.
Then after that I cleaned them with water to get rid of the sand and then started the work.
I prepped the aluminum for paint using a solution of alcohol mixed 1:1 with water to remove oil and grease. I taped over the faces where I was going to polish and taped the holes between the spokes closed so I wouldn't get overspray on the inside of the wheel. Then I cut away the excess tape so all that was taped was the area I wanted to be aluminum (the small part between the "spokes". You can use an epoxy wheel paint or you can use the rattle cans found at any auto parts store. Duplicolor makes what they call "High Performance Wheel Coating" and there is even a clear coat to seal it.
With everything masked, wipe the wheel down again and then spray the black paint following manufacturer directions. For Duplicolor, it was basically 2 light coats and a medium wet coat each 10 minutes apart (all within an hour). With that done, I moved onto the clear coat, the procedure for it was the same. Bear in mind, if you're doing black and clear, you need to put ALL the coats on within an hour, so that leaves no extra time. Otherwise, wait a week to put the clear one. The clear must be done in low humidity or it will turn milky! That's from experience, I had to redo the first wheel.
With all that done, wait for it to dry, then I removed the tape and left the wheel to cure for a few days. With the paint cured, I sanded the faces I wanted to polish with a flap wheel on a dremel (sandpaper does the same job, just much much slower). Beginning with a low grit of maybe 120 or 220 if the wheel is in good shape and working through 320, 400, and 600. After that, I used a metal polishing compound to bring out the final results and that was it.
I know that was a lot of info, sorry! Haha.
Sheldon
1969 2000 (SRL311-08217)
1991 Toyota Corolla
1974 BMW 2002 (M42 Swapped)
1969 2000 (SRL311-08217)
1991 Toyota Corolla
1974 BMW 2002 (M42 Swapped)
-
bikermike
- Site Supporter
- Posts: 1761
- Joined: Wed Jul 06, 2011 4:06 pm
- Location: Denver Area, CO
- Model: 1500/1600
- Year: Low Windshield-64-67.5
Re: SRL311-08217 Frame-Off Resto COMPLETE!
Thanks for the info. Hopefully my results will be as good as yours.
-Mike
1967.5 SPL311
1972 240z / L28
2003 BMW 525i Touring
2014 Jeep KL
1967.5 SPL311
1972 240z / L28
2003 BMW 525i Touring
2014 Jeep KL
-
Speedyshel
- Roadster Fanatic
- Posts: 210
- Joined: Sun Oct 03, 2010 5:47 pm
- Location: Moody, AL
Re: SRL311-08217 Frame-Off Resto COMPLETE!
I'm sure it will! Nothing fancy was done, just taking time and care was all it took. Yours will look great I'm sure! Keep me posted with progress when you do, I'm always up to seeing other ideas that are done. 
Sheldon
1969 2000 (SRL311-08217)
1991 Toyota Corolla
1974 BMW 2002 (M42 Swapped)
1969 2000 (SRL311-08217)
1991 Toyota Corolla
1974 BMW 2002 (M42 Swapped)
-
bikermike
- Site Supporter
- Posts: 1761
- Joined: Wed Jul 06, 2011 4:06 pm
- Location: Denver Area, CO
- Model: 1500/1600
- Year: Low Windshield-64-67.5
Re: SRL311-08217 Frame-Off Resto COMPLETE!
Will do. The wheels in question are the ones in this thread:
http://311s.org/phpBB3/viewtopic.php?f=34&t=15017
They are similar in style except the spokes and lip are chromed.
I am considering what to do with them. The chrome looking finish and black paint are flaking off in spots. Before I commit to a new set of tires for them I want to get them looking better.
I like the way your car turned out. It is certainly eye catching. Enjoy!
-Mike
1967.5 SPL311
1972 240z / L28
2003 BMW 525i Touring
2014 Jeep KL
1967.5 SPL311
1972 240z / L28
2003 BMW 525i Touring
2014 Jeep KL
-
Speedyshel
- Roadster Fanatic
- Posts: 210
- Joined: Sun Oct 03, 2010 5:47 pm
- Location: Moody, AL
Re: SRL311-08217 Frame-Off Resto COMPLETE!
Thanks a lot Mike. Those are some nice wheels! They look awesome, I didn't see much imperfection from those pictures. They really are good looking with that body colour body and trim. I like it even before you've done anything to them
Sheldon
1969 2000 (SRL311-08217)
1991 Toyota Corolla
1974 BMW 2002 (M42 Swapped)
1969 2000 (SRL311-08217)
1991 Toyota Corolla
1974 BMW 2002 (M42 Swapped)
-
Speedyshel
- Roadster Fanatic
- Posts: 210
- Joined: Sun Oct 03, 2010 5:47 pm
- Location: Moody, AL
Re: SRL311-08217 Frame-Off Resto COMPLETE!
Stripped the motor down now and the head is being rebuilt. This is all for a timing chain replacement, no real need to do the cylinder head. The valves were still sealing better than ever when tested on a vacuum bench. Compression test revealed 185psi-191psi across the board on all cylinders. I was quite happy to see that. Hadn't tested compression for fear of what I'd find, but it wasn't so bad after all. Even leak down didn't change anything. Two cylinder went up a couple psi, but that's nothing in the grand scheme of things. Pics soon I hope!
Sheldon
1969 2000 (SRL311-08217)
1991 Toyota Corolla
1974 BMW 2002 (M42 Swapped)
1969 2000 (SRL311-08217)
1991 Toyota Corolla
1974 BMW 2002 (M42 Swapped)
-
Roman
- Site Supporter
- Posts: 1197
- Joined: Mon Apr 23, 2012 11:41 pm
- Location: Shasta, the lake, in the state of Jefferson!
- Contact:
Re: SRL311-08217 Frame-Off Resto COMPLETE!
The milkyness occurs from moisture in the air. A simple cure for that is to use a hair dryer or a heat gun on a low setting. You gotta keep it moving around so you don't get any bubbles. The heat pulls the moisture out of the lacquer. Most of that duplicolor stuff is acrylic lacquer.Speedyshel wrote: The clear must be done in low humidity or it will turn milky! That's from experience, I had to redo the first wheel.
To get back on topic, nice job on the car!
Will trade guitars for roadsters, food, shelter, clothes, etc, etc.
-
Down under 311

- Roadsteraholic
- Posts: 541
- Joined: Mon May 14, 2012 6:11 am
- Location: Queensland Australia
Re: SRL311-08217 Frame-Off Resto COMPLETE!
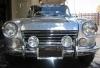
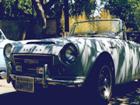
classic that is the same colour and wheels that were on my car when i originally bought it (well the girlfirend with a job bought it off dat2kman!)
68 Datsun 2000 solex carbs matching number ... Now with long pipes 
67.5 number 662
2005 Porsche 997 SOLD
62 karmann ghia restored SOLD
67.5 number 662
2005 Porsche 997 SOLD
62 karmann ghia restored SOLD
-
only in a datsun

- Roadster Nut
- Posts: 53
- Joined: Tue May 05, 2009 8:59 am
- Location: Mass
Re: SRL311-08217 Frame-Off Resto COMPLETE!
Car is looking great! keep up the good work. Keep posting pics, it serves as a motivator to others.
67.5 Roadster
77 280Z Turbo ( the beast! )
86 Porsche 944 Turbo
Suzuki RF900
Ducati M750
etc...
77 280Z Turbo ( the beast! )
86 Porsche 944 Turbo
Suzuki RF900
Ducati M750
etc...
-
Fubar
Curse of the back yard Datsun restore dudes
Dude well done and I had a similar thing happen with a storm. Put a few new dings in her. I did the same as you just rolled up my sleves and wipped off the big stuff and started rocking again. I posted another topic but since we are now brothers from another mother in samey almost samey incidents I give you a well earned tip o the hat!
You do not have the required permissions to view the files attached to this post.
-
Speedyshel
- Roadster Fanatic
- Posts: 210
- Joined: Sun Oct 03, 2010 5:47 pm
- Location: Moody, AL
Re: Curse of the back yard Datsun restore dudes
@RFR: Thanks for that, that really does explain why heat does the trick. I've seen it done, but never knew the reason! Makes perfect sense, and thanks for the support!
Thanks for the encouragement everyone, not only does it serve as a motivator to others, it keeps me interested in the game I'll keep posting pics, got lots that I haven't posted so I'll add them soon.
Man, Fubar, that does stink - but you're right in that it's all a matter of trudging forward through it. Makes for a great memory later on hahaha!
Thanks for the encouragement everyone, not only does it serve as a motivator to others, it keeps me interested in the game
Man, Fubar, that does stink - but you're right in that it's all a matter of trudging forward through it. Makes for a great memory later on hahaha!
Sheldon
1969 2000 (SRL311-08217)
1991 Toyota Corolla
1974 BMW 2002 (M42 Swapped)
1969 2000 (SRL311-08217)
1991 Toyota Corolla
1974 BMW 2002 (M42 Swapped)
-
Speedyshel
- Roadster Fanatic
- Posts: 210
- Joined: Sun Oct 03, 2010 5:47 pm
- Location: Moody, AL
Re: SRL311-08217 Frame-Off Resto COMPLETE!
Finally got around to install the interior in the car http://www.flickr.com/photos/61986249@N ... /lightbox/" onclick="window.open(this.href);return false;
Slowly but surely it's coming together. I'm convinced the bugs in the engine are the last thing that are going to be completely worked out.
Slowly but surely it's coming together. I'm convinced the bugs in the engine are the last thing that are going to be completely worked out.
Sheldon
1969 2000 (SRL311-08217)
1991 Toyota Corolla
1974 BMW 2002 (M42 Swapped)
1969 2000 (SRL311-08217)
1991 Toyota Corolla
1974 BMW 2002 (M42 Swapped)
-
Speedyshel
- Roadster Fanatic
- Posts: 210
- Joined: Sun Oct 03, 2010 5:47 pm
- Location: Moody, AL
Re: SRL311-08217 Frame-Off Resto COMPLETE!
Polished my valve cover real quick last night. I worked on it for 3 hours to see the potential, I'll work on it some more soon.
http://www.flickr.com/photos/63163123@N ... /lightbox/" onclick="window.open(this.href);return false;
http://www.flickr.com/photos/63163123@N ... /lightbox/" onclick="window.open(this.href);return false;
http://www.flickr.com/photos/63163123@N ... /lightbox/" onclick="window.open(this.href);return false;
http://www.flickr.com/photos/63163123@N ... /lightbox/" onclick="window.open(this.href);return false;
Sheldon
1969 2000 (SRL311-08217)
1991 Toyota Corolla
1974 BMW 2002 (M42 Swapped)
1969 2000 (SRL311-08217)
1991 Toyota Corolla
1974 BMW 2002 (M42 Swapped)
-
Speedyshel
- Roadster Fanatic
- Posts: 210
- Joined: Sun Oct 03, 2010 5:47 pm
- Location: Moody, AL
Re: SRL311-08217 Frame-Off Resto COMPLETE!
I discovered the previous owner had installed a strange 1" thick spacer at the rear leaf spring mounts so the car was abnormally high in the rear. I removed the right side thus far to get this:
Before: http://www.flickr.com/photos/61986249@N ... /lightbox/" onclick="window.open(this.href);return false;
After: http://www.flickr.com/photos/61986249@N ... /lightbox/" onclick="window.open(this.href);return false;
Sorry for the poor photos, I took it with my phone with poor lighting.
I also polished the valve cover a bit, I still plan to do some more polishing compound to bring out a higher luster: http://www.flickr.com/photos/61986249@N ... /lightbox/" onclick="window.open(this.href);return false; (poor picture again)
And finally, a new trunk seal: http://www.flickr.com/photos/61986249@N ... /lightbox/" onclick="window.open(this.href);return false;
Sheldon
1969 2000 (SRL311-08217)
1991 Toyota Corolla
1974 BMW 2002 (M42 Swapped)
1969 2000 (SRL311-08217)
1991 Toyota Corolla
1974 BMW 2002 (M42 Swapped)