Hey everyone,
In light of the fact that many projects start with an unorganized, unplanned and frenzied tear down followed by an ebay sale entitled "No time to finish...project car for sale", I'd like to lay out a plan for my project before touching a single tool in the toolbox. I don't want this to be me!
I am looking for some basic universal information on the steps / stages that every roadster project (off frame) should include. Obviously if one project includes an engine swap and another keeps the original then the steps are different but we can categorize both into an engine category. With me so far?
I also know that some things will need to be done on some cars and not on others, e.g., rust repair (okay bad example...its a Datsun)
Anyway, I don't really know what order to tackle things and I am looking for some guidance.
Help.
Project planning assistance
Moderators: notoptoy, S Allen, Solex68
-
DatsunDave

- Roadsteraholic
- Posts: 613
- Joined: Fri Dec 15, 2006 2:59 pm
- Location: Edmonton, Alberta, Canada
- Contact:
Project planning assistance
1969 2000 - for sale soon
1966 1600
1970 521
1974 (early) 260z
2003 Frontier Desert Runner
1965 VW Kombi
1966 1600
1970 521
1974 (early) 260z
2003 Frontier Desert Runner
1965 VW Kombi
-
fj20spl311
- Roadsteraholic
- Posts: 5015
- Joined: Mon Nov 28, 2005 3:54 pm
- Location: San Diego, Ca
Re: Project planning assistance
are you talking a frame off, or just a quick repair?
Phil
Phil
Phil
67.5 SRL311-00148 Blue (FJ cruiser VOODOO Blue)
67.5 SPL311 FJ20E teal SDS EFI
69 SRL311 SOLD
19 Raptor SCAB
67.5 SRL311-00148 Blue (FJ cruiser VOODOO Blue)
67.5 SPL311 FJ20E teal SDS EFI
69 SRL311 SOLD
19 Raptor SCAB
-
DatsunDave
- Roadsteraholic
- Posts: 613
- Joined: Fri Dec 15, 2006 2:59 pm
- Location: Edmonton, Alberta, Canada
- Contact:
Re: Project planning assistance
Frame off.
1969 2000 - for sale soon
1966 1600
1970 521
1974 (early) 260z
2003 Frontier Desert Runner
1965 VW Kombi
1966 1600
1970 521
1974 (early) 260z
2003 Frontier Desert Runner
1965 VW Kombi
-
Skyman

- Roadster Fanatic-Site Supporter
- Posts: 2397
- Joined: Thu Dec 15, 2005 6:49 pm
- Location: Salt Lake City, Utah
Re: Project planning assistance
This isn't really the "steps to take", but if I could make one recommendation, it would be to photo and video document the tear down. Put all parts/nuts bolts in ziplock bags, then in boxes. Mark the bags and boxes well. Try to categorize them. Dash, exhaust, interior, etc. etc..
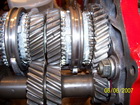
I found it easier to take out the engine/drive train before the body.
Kyle
I found it easier to take out the engine/drive train before the body.
Kyle
67.5 SRL311-00060
67.5 SPL311-14241
2004 Porsche 911 Turbo
2003 Ford Powerstroke; Piped & Chipped
67.5 SPL311-14241
2004 Porsche 911 Turbo
2003 Ford Powerstroke; Piped & Chipped
-
DatsunDave
- Roadsteraholic
- Posts: 613
- Joined: Fri Dec 15, 2006 2:59 pm
- Location: Edmonton, Alberta, Canada
- Contact:
Re: Project planning assistance
Those are actually excellent "steps".
I had planned on a systematic approach of going around the car taking photos and notes and again with video before I tear anything out.
Then on disassembly, I also like your advice on taking detailed photos and notes on the areas of the car when it isn't absolutely obvious how things go back together...likely most of it. hahaha.
1969 2000 - for sale soon
1966 1600
1970 521
1974 (early) 260z
2003 Frontier Desert Runner
1965 VW Kombi
1966 1600
1970 521
1974 (early) 260z
2003 Frontier Desert Runner
1965 VW Kombi
-
Kevin Desirello

- Roadster Fanatic
- Posts: 309
- Joined: Fri May 02, 2008 10:34 pm
- Location: Riverside Ca.
- Contact:
Re: Project planning assistance
Try not to let to much time pass before reassembly!!!
Looking back at pictures and videos are still a B!TCH!!
Definately still great advice take as much pics and vid as possible and bag and tag everything.
As you are pulling off parts acess eveything and make notes of things that need to be replaced ie: ball joints, tie rods " u" joints rubber ect.
I put all notes and reciepts in a folder so they will not get lost.
Most of the time notes and reciepts are the first to go buy buy.
Keep everything in one place and well organized so pieces wont get lost.
I like to set up some shelves on one side of the garage.
If you are planning on a engine swap you will need to do all of the mock up be for you pull the body to get the engine placed right you will even need to put the hood and latch back on.
Kevin
http://www.krdroadsters.com" onclick="window.open(this.href);return false;" onclick="window.open(this.href);return false;
https://www.facebook.com/KrdKevinsRestorableDatsuns" onclick="window.open(this.href);return false;"
68 2L 01727 SR20DE
68 2L 01731 stock
67.5 2L 491 stock solex
64 1500 02104C SR20DE
63 Wagon SR20DE S14 auto
https://www.facebook.com/KrdKevinsRestorableDatsuns" onclick="window.open(this.href);return false;"
68 2L 01727 SR20DE
68 2L 01731 stock
67.5 2L 491 stock solex
64 1500 02104C SR20DE
63 Wagon SR20DE S14 auto
-
DatsunDave
- Roadsteraholic
- Posts: 613
- Joined: Fri Dec 15, 2006 2:59 pm
- Location: Edmonton, Alberta, Canada
- Contact:
Re: Project planning assistance
Good stuff Kevin. Keep it coming people. 
...no engine swap for me but good point.
...no engine swap for me but good point.
1969 2000 - for sale soon
1966 1600
1970 521
1974 (early) 260z
2003 Frontier Desert Runner
1965 VW Kombi
1966 1600
1970 521
1974 (early) 260z
2003 Frontier Desert Runner
1965 VW Kombi
-
shifty
- Roadster Enthusiast
- Posts: 1166
- Joined: Mon Dec 20, 2004 10:56 am
- Location: Portland, OR
- Contact:
Re: Project planning assistance
Here's my 2¢.
Have a detailed plan of what you want to end up with, paint, trim, wheels etc. The more detailed the better.
Evaluate the car - make a list of what is good and what needs work.
Figure out your budget - and if possible have the money ready and set aside. Many projects stall due to lack of cash.
Get as many of the parts that you know you will need before you get started.
I've been told to save the engine work for last, especially if the resto will take a while. Better not to have a rebuilt engine sitting for a long time while the rest of the work is done.
Take lots of pictures of your tear down. Make notes and digrams. Store everything really well so you can find it easily.
One approach is to clean and restore the parts as they come off the car. This way, when the car is finally all apart, it's ready to go back together. Put the subassemblies back together as soon as possible so you don't forget how they go together. Much more fun ot tear everything down at once!
Best tip: have another running roadster for reference and inspiration in the middle of the project.
Leigh Brooks
http://www.shiftco.com - my blog about cars (and stuff)
Latest post: http://www.shiftco.com/radios/the-test-mule/
67.5 SRL-00139 sleeping
67.5 SPL-11481 suspended animation
67.5 SPL-12961 snoring
67.5 SPL-13622 - H20 PWR!
http://www.shiftco.com - my blog about cars (and stuff)
Latest post: http://www.shiftco.com/radios/the-test-mule/
67.5 SRL-00139 sleeping
67.5 SPL-11481 suspended animation
67.5 SPL-12961 snoring
67.5 SPL-13622 - H20 PWR!
-
DatsunDave
- Roadsteraholic
- Posts: 613
- Joined: Fri Dec 15, 2006 2:59 pm
- Location: Edmonton, Alberta, Canada
- Contact:
Re: Project planning assistance
Great tips Leigh. Thank you.
Can enyone tell me what order they do the paint? I have seen engine compartments painted first, then the engine goes in and then teh rest of the car is painted. I have also seen the entire car painted and then engine put in. ???
Can enyone tell me what order they do the paint? I have seen engine compartments painted first, then the engine goes in and then teh rest of the car is painted. I have also seen the entire car painted and then engine put in. ???
1969 2000 - for sale soon
1966 1600
1970 521
1974 (early) 260z
2003 Frontier Desert Runner
1965 VW Kombi
1966 1600
1970 521
1974 (early) 260z
2003 Frontier Desert Runner
1965 VW Kombi
-
dbrick

- Roadster Fanatic-Site Supporter
- Posts: 10084
- Joined: Thu Sep 09, 2004 11:05 pm
- Location: Kenilworth, New Jersey
Re: Project planning assistance
Leigh, That is one of the best ideas I've heard in a long time. The discipline to do it that way is tough, but the ease of reassembly would make it very worthwhile. I was given a spare frame by MGSlayer, if I were to do the restoration, I'd prep the frame, and follow Leigh's procedure, remove parts from the old frame, restore, and onto new frame.The only thing I would add, if space allows, a parts car can be a great help. Personally I would pick one beyond repair, saves the temptation to fix it. This gives, as Leigh said, a reference and also a set of spare parts. It can also be a test stand to run in a new stock motor, and a mule for an engine swap, if that's the route you take.shifty wrote:Here's my 2¢.
One approach is to clean and restore the parts as they come off the car. This way, when the car is finally all apart, it's ready to go back together. Put the subassemblies back together as soon as possible so you don't forget how they go together. Much more fun ot tear everything down at once!
Sounds like you have a plan. Now to pick a color!
Dave Brisco
Take my advice, I'm not using it"
66 2000 The Bobster
64 1500 in pieces for sale
1980 Fiat X1/9
2009 Volvo C-70
08 Expedition EL, STUPID huge but comfy
1962 Thompson Sea Lancer, possible money pit
-
ppeters914
- Roadster Fanatic-Site Supporter
- Posts: 3075
- Joined: Mon Jun 28, 2004 5:51 pm
- Location: Lake Forest Park, WA (just north of Seattle)
- Model: 1500/1600
- Year: Low Windshield-64-67.5
Re: Project planning assistance
Kinda depends if you're doing frame-off or partial.....paint shop or DIY....etc, etc.DatsunDave wrote:Great tips Leigh. Thank you.
Can enyone tell me what order they do the paint? I have seen engine compartments painted first, then the engine goes in and then teh rest of the car is painted. I have also seen the entire car painted and then engine put in. ???
Pete
-------------------------------------
'67 1600 - frame off started in 2014. Now I know why roadster projects take so long. What a stupid idea.
'66 1600 - parts car
'66 WPL411 ***SOLD***
A couple of Porsches, a RAV4 Hybrid, and a motorcycle
-------------------------------------
'67 1600 - frame off started in 2014. Now I know why roadster projects take so long. What a stupid idea.
'66 1600 - parts car
'66 WPL411 ***SOLD***
A couple of Porsches, a RAV4 Hybrid, and a motorcycle
-
dbrick
- Roadster Fanatic-Site Supporter
- Posts: 10084
- Joined: Thu Sep 09, 2004 11:05 pm
- Location: Kenilworth, New Jersey
Re: Project planning assistance
As far as when to paint what, If it were me, I would complete the chassis, install the drivetrain and exhaust etc. I would then complete the underhood stuff on the body, such as brake lines, wiring heater box as much as possible, and then lower the body onto the frame with the engine in place. I don't know if you could clear the carburetors with the body.
I was always paranoid about swinging an engine into a newly painted car, and then all the wrenching etc to complete the install around fresh paint.
I was always paranoid about swinging an engine into a newly painted car, and then all the wrenching etc to complete the install around fresh paint.
Dave Brisco
Take my advice, I'm not using it"
66 2000 The Bobster
64 1500 in pieces for sale
1980 Fiat X1/9
2009 Volvo C-70
08 Expedition EL, STUPID huge but comfy
1962 Thompson Sea Lancer, possible money pit
-
DatsunDave
- Roadsteraholic
- Posts: 613
- Joined: Fri Dec 15, 2006 2:59 pm
- Location: Edmonton, Alberta, Canada
- Contact:
Re: Project planning assistance
ppeters914 wrote:Kinda depends if you're doing frame-off or partial.....paint shop or DIY....etc, etc.DatsunDave wrote:Great tips Leigh. Thank you.
Can enyone tell me what order they do the paint? I have seen engine compartments painted first, then the engine goes in and then teh rest of the car is painted. I have also seen the entire car painted and then engine put in. ???
+ likely paint shopDatsunDave wrote:Hey everyone,
I am looking for some basic universal information on the steps / stages that every roadster project (off frame) should include.
1969 2000 - for sale soon
1966 1600
1970 521
1974 (early) 260z
2003 Frontier Desert Runner
1965 VW Kombi
1966 1600
1970 521
1974 (early) 260z
2003 Frontier Desert Runner
1965 VW Kombi
-
DatsunDave
- Roadsteraholic
- Posts: 613
- Joined: Fri Dec 15, 2006 2:59 pm
- Location: Edmonton, Alberta, Canada
- Contact:
Re: Project planning assistance
After searching the interwebs for more info on this I FINALLY found a site that had a pretty good breakdown.
It doesn't quite address when to paint what to facilitate reassembly but overall the best I've found so far.
http://www.theymightberacing.com/Restor ... ation.aspx" onclick="window.open(this.href);return false;
It doesn't quite address when to paint what to facilitate reassembly but overall the best I've found so far.
http://www.theymightberacing.com/Restor ... ation.aspx" onclick="window.open(this.href);return false;
1969 2000 - for sale soon
1966 1600
1970 521
1974 (early) 260z
2003 Frontier Desert Runner
1965 VW Kombi
1966 1600
1970 521
1974 (early) 260z
2003 Frontier Desert Runner
1965 VW Kombi
-
23yrRebuild
- Roadster Fanatic-Site Supporter
- Posts: 1086
- Joined: Sat Oct 25, 2003 2:19 pm
- Location: 3rd rock from the sun
- Model: 1500/1600
- Year: Low Windshield-64-67.5
Re: Project planning assistance
There was some sound logic in the article(s). Thanks for sharing.
Speaking of DIY restoration, I came across this site. Check out the extensive photo documentation of this guy's DIY resto on his 1959 Cadillac and 1963 Jaguar XKE. I especially enjoyed the body and paint sections on his Jag.
http://www.mckennasgarage.com" onclick="window.open(this.href);return false;
Mike - '67 Stroker / 5-Speed