What did you do TO or FOR your Datsun today?(Roadsters only)
Moderators: notoptoy, S Allen, Solex68
-
C.Costine
- Roadster Nut-Site Supporter
- Posts: 1736
- Joined: Fri Feb 13, 2015 8:08 pm
Re: What did you do TO or FOR your Datsun today?(Roadsters only)
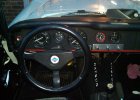
I sprayed the dash with texture paint.the first pic is before. second after, third is closer of the area of transition from un-patched to patched part.Next step is to top coat, probably with gloss black bumper paint.
You do not have the required permissions to view the files attached to this post.
located in Chester NH
1967 1600 in restoration
2013 Arctic Cat F-1100 turbo
Ford F-350 6.0
Ford 9000 puller, Ford 960 puller, Ford 901show, Ford 971 worker, Oliver 70 waiting its turn
1967 1600 in restoration
2013 Arctic Cat F-1100 turbo
Ford F-350 6.0
Ford 9000 puller, Ford 960 puller, Ford 901show, Ford 971 worker, Oliver 70 waiting its turn
-
Jujuman
- Site Supporter
- Posts: 162
- Joined: Tue Sep 07, 2010 9:12 pm
- Location: Tampa Florida
- Model: 1500/1600
- Year: Low Windshield-64-67.5
Re: What did you do TO or FOR your Datsun today?(Roadsters only)
that is amazing, I see the last after pic is upside down but that looks phenomenal.
spray foam, regular expansion, sawed down to sculpt. did you sand at all.
what do you suspect the longevity to be?
I assume bumper paint may have some strength to it.
spray foam, regular expansion, sawed down to sculpt. did you sand at all.
what do you suspect the longevity to be?
I assume bumper paint may have some strength to it.
Jujuman
Red 67.5 SPL-311-13263
Gold 65 SPL-311-01613 (in boxes)
2007 Expedition EL
Red 67.5 SPL-311-13263
Gold 65 SPL-311-01613 (in boxes)
2007 Expedition EL
-
Jujuman
- Site Supporter
- Posts: 162
- Joined: Tue Sep 07, 2010 9:12 pm
- Location: Tampa Florida
- Model: 1500/1600
- Year: Low Windshield-64-67.5
Re: What did you do TO or FOR your Datsun today?(Roadsters only)
almost finished with my new garage.
20x30 9.5 foot ceilings. roll up doors. - no power yet, no lift yet
moved in the 3 roadsters,
2 on skates
I set from amazon.com 6000lb
the other set from harbor freight - (I kinda like these better - have locks and a handle)
received my seat covers in the mail
pulled my 67.5 seats out of storage, to rehab them.
took the rails to the carwash to de-gunk (its cold)
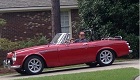
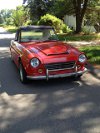
and bought some pretty new jewels for the red one.
pics to follow
20x30 9.5 foot ceilings. roll up doors. - no power yet, no lift yet
moved in the 3 roadsters,
2 on skates
I set from amazon.com 6000lb
the other set from harbor freight - (I kinda like these better - have locks and a handle)
received my seat covers in the mail
pulled my 67.5 seats out of storage, to rehab them.
took the rails to the carwash to de-gunk (its cold)
and bought some pretty new jewels for the red one.
pics to follow
Jujuman
Red 67.5 SPL-311-13263
Gold 65 SPL-311-01613 (in boxes)
2007 Expedition EL
Red 67.5 SPL-311-13263
Gold 65 SPL-311-01613 (in boxes)
2007 Expedition EL
-
C.Costine
- Roadster Nut-Site Supporter
- Posts: 1736
- Joined: Fri Feb 13, 2015 8:08 pm
Re: What did you do TO or FOR your Datsun today?(Roadsters only)
The texture coat is for texture only. Here is another pic of the filling process. After veeing out and filling with foam, and trimming that with a hack saw blade, I tapered the opening back some more with a cutting wheel in my 4.5 inch grinder. The larger wheel works much better than a dremel for this. Then I filled with Bumper Bite by SEM for repairing plastic bumpers. It stays flexible. I applied numerous coats sanding between them. I filled a good portion of the area where the cracks were with probably a 3/16 to 1/4 thick layer of the Bumper Bite, to hopefully get a lot more strength, so that it should last a long time. In the transition area near the center the filler is probably 3/8 thick. This process is kind of a combination of four different ones that I found. Hours and hours of sanding.Jujuman wrote:that is amazing, I see the last after pic is upside down but that looks phenomenal.
spray foam, regular expansion, sawed down to sculpt. did you sand at all.
what do you suspect the longevity to be?
I assume bumper paint may have some strength to it.
You do not have the required permissions to view the files attached to this post.
located in Chester NH
1967 1600 in restoration
2013 Arctic Cat F-1100 turbo
Ford F-350 6.0
Ford 9000 puller, Ford 960 puller, Ford 901show, Ford 971 worker, Oliver 70 waiting its turn
1967 1600 in restoration
2013 Arctic Cat F-1100 turbo
Ford F-350 6.0
Ford 9000 puller, Ford 960 puller, Ford 901show, Ford 971 worker, Oliver 70 waiting its turn
-
Jujuman
- Site Supporter
- Posts: 162
- Joined: Tue Sep 07, 2010 9:12 pm
- Location: Tampa Florida
- Model: 1500/1600
- Year: Low Windshield-64-67.5
Re: What did you do TO or FOR your Datsun today?(Roadsters only)
Jujuman wrote:almost finished with my new garage.
20x30 9.5 foot ceilings. roll up doors. - no power yet, no lift yet
moved in the 3 roadsters,
2 on skates
I set from amazon.com 6000lb
the other set from harbor freight - (I kinda like these better - have locks and a handle)
received my seat covers in the mail
pulled my 67.5 seats out of storage, to rehab them.
took the rails to the carwash to de-gunk (its cold)
and bought some pretty new jewels for the red one.
pics to follow
You do not have the required permissions to view the files attached to this post.
Jujuman
Red 67.5 SPL-311-13263
Gold 65 SPL-311-01613 (in boxes)
2007 Expedition EL
Red 67.5 SPL-311-13263
Gold 65 SPL-311-01613 (in boxes)
2007 Expedition EL
-
notoptoy
- Vendor-Site Supporter
- Posts: 9677
- Joined: Fri Oct 02, 2009 2:55 pm
- Location: Winston-Salem, NC and Ocala, FL
- Contact:
Re: What did you do TO or FOR your Datsun today?(Roadsters only)
Roll up doors are nice for enhanced overhead clearance. How tall/wide are those door openings?
"When all else fails, force prevails!" Ummm, we're gonna need a bigger hammer here.
67.5 SPL311 H20 w/5 speed
65 Impala Convertible
2017 C43 AMG
67.5 SPL311 H20 w/5 speed
65 Impala Convertible
2017 C43 AMG
-
Jujuman
- Site Supporter
- Posts: 162
- Joined: Tue Sep 07, 2010 9:12 pm
- Location: Tampa Florida
- Model: 1500/1600
- Year: Low Windshield-64-67.5
Re: What did you do TO or FOR your Datsun today?(Roadsters only)
8X8 DOORS 9.5 FOOT CELINGS
gonna get a bendpak 4post lift in the spring
gonna try to lay the power over the winter. gotta dig soon befor ground gets too cold
gonna get a bendpak 4post lift in the spring
gonna try to lay the power over the winter. gotta dig soon befor ground gets too cold
Jujuman
Red 67.5 SPL-311-13263
Gold 65 SPL-311-01613 (in boxes)
2007 Expedition EL
Red 67.5 SPL-311-13263
Gold 65 SPL-311-01613 (in boxes)
2007 Expedition EL
-
C.Costine
- Roadster Nut-Site Supporter
- Posts: 1736
- Joined: Fri Feb 13, 2015 8:08 pm
Re: What did you do TO or FOR your Datsun today?(Roadsters only)
Jujuman, whenever lifts come up on another forum that I visit frequently, two posters are pretty much always favored over four due to the greater accessibility of the underside of the car when those long wide ramps are not in the way.Jujuman wrote:8X8 DOORS 9.5 FOOT CELINGS
gonna get a bendpak 4post lift in the spring
gonna try to lay the power over the winter. gotta dig soon befor ground gets too cold
located in Chester NH
1967 1600 in restoration
2013 Arctic Cat F-1100 turbo
Ford F-350 6.0
Ford 9000 puller, Ford 960 puller, Ford 901show, Ford 971 worker, Oliver 70 waiting its turn
1967 1600 in restoration
2013 Arctic Cat F-1100 turbo
Ford F-350 6.0
Ford 9000 puller, Ford 960 puller, Ford 901show, Ford 971 worker, Oliver 70 waiting its turn
-
66Dustin

- Roadster Nut
- Posts: 28
- Joined: Mon Aug 15, 2011 3:55 pm
- Location: Lubbock, Texas
Re: What did you do TO or FOR your Datsun today?(Roadsters only)
First off howdy.C.Costine wrote:The texture coat is for texture only. Here is another pic of the filling process. Datsun Dash 3.JPGJujuman wrote:that is amazing, I see the last after pic is upside down but that looks phenomenal.
spray foam, regular expansion, sawed down to sculpt. did you sand at all.
what do you suspect the longevity to be?
I assume bumper paint may have some strength to it.
After veeing out and filling with foam, and trimming that with a hack saw blade, I tapered the opening back some more with a cutting wheel in my 4.5 inch grinder. The larger wheel works much better than a dremel for this. Then I filled with Bumper Bite by SEM for repairing plastic bumpers. It stays flexible. I applied numerous coats sanding between them. I filled a good portion of the area where the cracks were with probably a 3/16 to 1/4 thick layer of the Bumper Bite, to hopefully get a lot more strength, so that it should last a long time. In the transition area near the center the filler is probably 3/8 thick. This process is kind of a combination of four different ones that I found. Hours and hours of sanding.
Been away from the forum for years and recently got my 66 back at my house where she belongs.
I too am needing to redo a dash so your post is interesting and relevant to me.
So I googled "bumper brite" it's on there about halfway down the page. But the first several results were for a (no kidding) anal bleaching spray from a gay sex toy website. I laughed....hard.
Just thought I'd share.
From the ad
"Developed just for us and tested by over 100 Grunts, Bumper Brite, anal whitening, is proven to lighten 'n even out the darker tone of your tuckus to match the surrounding skin. This cream reveals the real YOU.
Simply apply a light coating ONLY on your hole 2-3 times per day for a week. In no time flat you will have a brighter sphincter that you'll be PROUD to show...and other guys will admire! The 2 ounce bottle with PUMP is all you need to get started."
66 SPL311 number 919
Joined in 2004, formerly known as doperide
Joined in 2004, formerly known as doperide
-
pebbles
- Roadster Fanatic-Site Supporter
- Posts: 3925
- Joined: Thu Dec 16, 2010 12:00 am
- Location: Washington
Re: What did you do TO or FOR your Datsun today?(Roadsters only)
Um,,, i think you spelled "bite" wrong... lol
David
"When we were standing next to the motor while on the dyno, and the motor hit VVL, eyes went watery.."
"When we were standing next to the motor while on the dyno, and the motor hit VVL, eyes went watery.."
-
66Dustin
- Roadster Nut
- Posts: 28
- Joined: Mon Aug 15, 2011 3:55 pm
- Location: Lubbock, Texas
Re: What did you do TO or FOR your Datsun today?(Roadsters only)
That's even funnier.pebbles wrote:Um,,, i think you spelled "bite" wrong... lol
66 SPL311 number 919
Joined in 2004, formerly known as doperide
Joined in 2004, formerly known as doperide
-
Mainer311
- Roadsteraholic
- Posts: 877
- Joined: Sat Jun 30, 2012 10:30 pm
- Location: Methuen, MA, USA
Re: What did you do TO or FOR your Datsun today?(Roadsters only)
*walks into Datsun forum, promptly walks out*
Jordan
1968 SPL311-21773. Needs paint and some upholstery.
2012 Xterra Pro-4X, 4" lift on 34's, UCA's, pre-runner bumper. Member of the New England Xterra Off-road club.
1971 PL521, Dragon green. Stock L16 w/ 4 speed, lowered 3".
1968 SPL311-21773. Needs paint and some upholstery.
2012 Xterra Pro-4X, 4" lift on 34's, UCA's, pre-runner bumper. Member of the New England Xterra Off-road club.
1971 PL521, Dragon green. Stock L16 w/ 4 speed, lowered 3".
-
66Dustin
- Roadster Nut
- Posts: 28
- Joined: Mon Aug 15, 2011 3:55 pm
- Location: Lubbock, Texas
Re: What did you do TO or FOR your Datsun today?(Roadsters only)
Yup, I read wrong and holy smokes. Glad I didn't do an image search.Mainer311 wrote:*walks into Datsun forum, promptly walks out*

66 SPL311 number 919
Joined in 2004, formerly known as doperide
Joined in 2004, formerly known as doperide
-
Jdflyer
- Roadster Fanatic
- Posts: 246
- Joined: Mon Oct 26, 2015 12:50 am
- Location: Phoenix, AZ
Re: What did you do TO or FOR your Datsun today?(Roadsters only)
Almost finished the new socks.
You do not have the required permissions to view the files attached to this post.
1970 SPL 311-29311
Phoenix, AZ
Phoenix, AZ
-
Linda

- Fraternal Den Mother-RIP
- Posts: 7807
- Joined: Sat Nov 05, 2005 11:37 pm
- Location: Los Angeles
- Model: 1500/1600
- Year: High Windshield-68-70
Re: What did you do TO or FOR your Datsun today?(Roadsters only)
Plan is to replace gear reduction starter which is not engaging well. My records show it lasted 6 years, so not bad. After checking excellent Tech Wiki page to refresh my memory, I got a new gear reduction starter from DBElectrical on eBay, 45, free shipping, likely Chinese:-)
Finished. A little tighter going thru the opening than the last one. I used a short ratchet and deep socket for the top bolt with the rear carb removed. Shined up all connections and ground. Lower bolt needs to be a bit longer on this one as lower flange is slightly thicker., size is 10 mm x 1.50 x 50mm
Starts well.
Linda
Starts well.
Linda
You do not have the required permissions to view the files attached to this post.
Last edited by Linda on Sun Nov 27, 2016 6:59 pm, edited 3 times in total.
Sadly-Linda has passed away 2022. She was the 311's den mother and drove the first Rare-Parts ball joint project. RIP.